🎯 Learning Path:
- Complete REL-ID Initialization Flow Codelab
- Complete REL-ID Complete Activation & Login Flow Codelab
- Complete REL-ID IDV MFA Activation Flow Codelab (Recommended)
- You are here → Post-Login KYC Flow Implementation
Welcome to the REL-ID IDV Post-Login KYC Flow codelab! This tutorial teaches you how to implement comprehensive Know Your Customer (KYC) identity verification for activated customers using document scanning, facial recognition, and biometric authentication.
What You'll Build
In this codelab, you'll implement a complete post-login KYC workflow for activated customers:
- 🏠 Drawer Menu Integration: Access KYC from Dashboard navigation
- 🆕 Activated Customer KYC Screen: Entry point for post-login KYC initiation
- 📄 Document Scan Process: Automated document verification with workflow 6
- 📸 Document Details Confirmation: Interactive OCR data validation with challenge mode 9
- 🤳 Selfie Capture Process: Live selfie capture with liveness detection
- ✅ Selfie Biometric Verification: Face matching with challenge mode 9 navigation
- 🔐 Biometric Consent Management: Template storage consent with mode-based behavior
- 🔔 Persistent Event Handling: Screen-level handlers that remain active
- ✅ Dual Validation Pattern: Two-tier error checking for robust validation
Key Difference: Post-Login KYC vs Pre-Login IDV
This codelab demonstrates post-login KYC for activated customers, where identity verification occurs after user login for compliance purposes:
Pre-Login IDV Flow (Challenge Mode 8):
Activation Code → IDV (Document → Selfie → Consent) → Password Setup → Dashboard

Post-Login KYC Flow (Challenge Mode 9 - This Codelab):
Login → Dashboard → Navigate to KYC → IDV (Document → Selfie → Consent) → Completion
Critical Differences:
- Workflow: 6 (RDNA_IDV_POSTLOGIN_KYC) instead of 0-5
- Challenge Mode: 9 (post-login) instead of 8 (pre-login)
- Entry Point: ActivatedCustomerKYCScreen (drawer menu) instead of activation flow
- Event Handling: Persistent screen-level handlers instead of global-only handlers
- Close Button: Challenge mode-based navigation (mode 9 uses cancel APIs or direct navigation)
- Validation: Dual validation pattern (SDK sync error + backend status code)
What You'll Learn
- ✅ How to implement post-login KYC workflow for activated customers
- ✅ Using workflow 6 (RDNA_IDV_POSTLOGIN_KYC) and challenge mode 9
- ✅ Implementing persistent event handlers that stay active across screens
- ✅ Managing drawer menu navigation for KYC access
- ✅ Document scanning with challenge mode 9 validation
- ✅ Selfie capture with challenge mode 9 navigation patterns
- ✅ Handling biometric consent with response structure differences
- ✅ Implementing dual validation pattern (sync error + backend status)
- ✅ Challenge mode-based close button behaviors
- ✅ Completing KYC with onActivatedCustomerKYCResponse event
Prerequisites
- Completion of REL-ID Initialization codelab
- Completion of REL-ID MFA Activation & Login codelab
- Understanding of pre-login IDV flow (recommended)
- Basic understanding of Cordova and JavaScript
- REL-ID SDK integration credentials
- Document scanning license (Regula)
- Test identity documents for scanning
Technology Stack
- Cordova: 12.0.0
- JavaScript: ES6+
- REL-ID SDK: cordova-plugin-rdna-client (Latest)
- Regula Document Reader: For document scanning and OCR
- Navigation: Single Page Application (SPA) pattern
Post-Login KYC Flow Diagram
Understanding the complete flow is crucial before implementation:
1. User Login (Activated Customer)
   ↓ (Existing credentials authenticated)

2. Dashboard → Open Drawer Menu
   ↓ (User navigates to KYC option)

3. 🆕 Activated Customer KYC Screen
   ├─ Display KYC information and requirements
   ├─ User clicks "Start KYC Verification"
   ├─ Screen-level event handler registered (persistent)
   ├─ initiateActivatedCustomerKYC("Post Login KYC")
   │  • workflow: 6 (RDNA_IDV_POSTLOGIN_KYC)
   │  • challengeMode: 9 (post-login)
   └─ SDK initiates post-login KYC workflow
   ↓

4. 📄 IDV Document Scan Process
   ├─ getIDVDocumentScanProcessStartConfirmation event
   │  • idvWorkflow: 6 (RDNA_IDV_POSTLOGIN_KYC)
   ├─ setIDVDocumentScanProcessStartConfirmation(true, 6)
   ├─ Native Document Capture (Regula SDK)
   ├─ getIDVConfirmDocumentDetails event
   │  • challengeMode: 9
   │  • response_data: OCR-extracted document fields
   │  • Close button: cancel API (mode 9) → triggers onActivatedCustomerKYCResponse
   └─ setIDVConfirmDocumentDetails(true, 9)
   ↓

5. 🤳 IDV Selfie Capture Process
   ├─ getIDVSelfieProcessStartConfirmation event
   │  • idvWorkflow: 6 (RDNA_IDV_POSTLOGIN_KYC)
   ├─ setIDVSelfieProcessStartConfirmation(true, false, 6)
   ├─ Native Selfie Capture (Liveness Detection)
   ├─ getIDVSelfieConfirmation event
   │  • challengeMode: 9
   │  • response_data: Biometric match results
   │  • Close button: navigate directly (mode 9) → no cancel API
   └─ setIDVSelfieConfirmation("true", 9)
   ↓

6. 🔐 IDV Biometric Consent
   ├─ getIDVBiometricOptInConsent event
   │  • challengeMode: 9
   │  • status at root level (no challengeResponse for mode 9)
   │  • Close button: navigate directly (mode 9)
   └─ setIDVBiometricOptInConsent(true, 9)
   ↓

7. ✅ KYC Completion
   ├─ onActivatedCustomerKYCResponse event triggered
   ├─ Screen-level handler receives event (even if on different screen)
   ├─ Handler navigates back to ActivatedCustomerKYCScreen
   ├─ Dual validation performed:
   │  • Check error.longErrorCode (0 = OK, 240 = User Cancelled)
   │  • Check status.statusCode (100 or 0 = success)
   ├─ Success/Error alert shown
   └─ User clicks OK → Navigate to Dashboard
IDV Workflow and Challenge Mode Values
For post-login KYC flow, you'll use these specific values:
Parameter | Value | Description |
idvWorkflow |
|
|
challengeMode |
| Post-login challenge mode |
Comparison with Pre-Login Flow:
Aspect | Pre-Login (Activation) | Post-Login (KYC) |
Workflow | 0-5 (Activation workflows) | 6 (RDNA_IDV_POSTLOGIN_KYC) |
Challenge Mode | 8 | 9 |
Entry Point | ActivationCodeScreen | ActivatedCustomerKYCScreen (drawer menu) |
Close Button (Document Confirm) | resetAuthState() | cancel API → triggers event |
Close Button (Selfie Confirm) | resetAuthState() | Direct navigation |
Close Button (Biometric Consent) | resetAuthState() | Direct navigation |
Response Structure | challengeResponse.status | status at root level |
Event Handler | Global provider only | Screen-level + global provider |
Before You Begin
Ensure you have completed these requirements:
1. Previous Codelabs Completed
- ✅ REL-ID Initialization Flow
- ✅ REL-ID MFA Activation & Login Flow
- ✅ REL-ID IDV MFA Activation Flow (Recommended for IDV understanding)
2. Development Environment
# Required tools
Node.js >= 16
npm or yarn
Cordova CLI
Xcode (for iOS) or Android Studio (for Android)
3. REL-ID SDK Credentials
- Connection profile configuration (agent_info.json)
- Valid REL-ID SDK license
- Document scanning license (Regula)
Get the Code from GitHub
The code to get started can be found in a GitHub repository.
You can clone the repository using the following command:
git clone https://github.com/uniken-team/relid-codelab-cordova.git
Navigate to the relid-IDV-post-login-kyc folder in the repository you cloned earlier:
cd relid-codelab-cordova/relid-IDV-post-login-kyc
Project Structure
The post-login KYC codelab follows this structure:
relid-IDV-post-login-kyc/
├── www/
│   ├── src/
│   │   ├── tutorial/
│   │   │   ├── screens/
│   │   │   │   ├── idv/                                      # IDV Screens
│   │   │   │   │   ├── activatedCustomerKyc/                # 🆕 KYC Entry Point
│   │   │   │   │   │   └── ActivatedCustomerKYCScreen.js    # Post-login KYC initiation
│   │   │   │   │   ├── IDVDocumentProcessStartConfirmationScreen.js
│   │   │   │   │   ├── IDVConfirmDocumentDetailsScreen.js
│   │   │   │   │   ├── IDVSelfieProcessStartConfirmationScreen.js
│   │   │   │   │   ├── IDVSelfieConfirmationScreen.js
│   │   │   │   │   └── IDVBiometricOptInConsentScreen.js
│   │   │   │   ├── mfa/                                      # MFA Screens
│   │   │   │   │   ├── DashboardScreen.js
│   │   │   │   │   └── ...
│   │   │   └── navigation/
│   │   │       └── NavigationService.js                      # 🆕 KYC route added
│   │   └── uniken/
│   │       ├── services/
│   │       │   └── idv/
│   │       │       ├── rdnaIDVService.js                     # 🆕 initiateActivatedCustomerKYC()
│   │       │       └── rdnaIDVEventManager.js                # 🆕 onActivatedCustomerKYCResponse event
│   │       └── utils/
│   │           └── connectionProfileParser.js                 # File loading with cordova-plugin-file
│   ├── index.html                                             # 🆕 KYC screen template added
│   └── js/
│       └── app.js                                             # deviceready pattern
├── plugins/
│   └── RdnaClient/                                            # LOCAL Cordova plugin
└── config.xml
IDV Assets Configuration
The project uses an automated Cordova hook to configure IDV assets for document verification and biometric capture. Unlike React Native which requires manual asset placement, Cordova handles this automatically during the build process.
Required Project Structure:
To use this automated hook in your own Cordova projects, you need the following structure at your project root:
your-cordova-project/
├── idv-native-resources/          # ⚠️ Required folder at project root
│   ├── common/                    # Shared files (copied to both platforms)
│   │   ├── regula.license         # License file (shared)
│   │   └── db.dat                 # 110.5MB document database (shared)
│   ├── ios/                       # iOS-only files
│   │   └── Certificates.bundle/
│   │       └── icaopkd-002-complete-000325.ldif
│   └── android/                   # Android-only files
│       └── assets/
│           └── Regula/
│               └── certificates/
│                   └── icaopkd-002-complete-000325.ldif
├── hooks/
│   └── after_prepare/
│       └── copy_idv_native_resources.js   # ⚠️ Automated hook script
├── platforms/
├── www/
└── config.xml
Key Design: The common/ folder holds shared resources (db.dat, regula.license) used by both platforms, while ios/ and android/ folders contain only platform-specific files.
How the Hook Works:
Hook Script: hooks/after_prepare/copy_idv_native_resources.js
When you run cordova prepare or cordova build, this hook automatically copies assets from idv-native-resources/ to platform-specific directories:
iOS Destinations (Automated by Hook):
common/regula.license→platforms/ios//Resources/regula.license common/db.dat→platforms/ios//Resources/db.dat ios/Certificates.bundle/→platforms/ios//Resources/Certificates.bundle/
Android Destinations (Automated by Hook):
common/regula.license→platforms/android/app/src/main/res/raw/regula.licensecommon/db.dat→platforms/android/app/src/main/assets/Regula/db.datandroid/assets/Regula/certificates/→platforms/android/app/src/main/assets/Regula/certificates/
Important:
- The
idv-native-resources/folder must exist at your project root with the exact structure shown above - The hook
copy_idv_native_resources.jsmust be inhooks/after_prepare/directory - Shared resources (db.dat, regula.license) go in
common/folder - Platform-specific files go in
ios/orandroid/folders - Assets are automatically copied during
cordova prepare- no manual setup needed - If assets are missing, the hook will log warnings but won't fail the build
- The hook also registers resources in Xcode project for iOS automatically
Install Cordova Plugins
Install the required plugins:
# Install local RdnaClient plugin
cordova plugin add ./RdnaClient

# Install file plugin for agent_info.json loading
cordova plugin add cordova-plugin-file

# Install device plugin
cordova plugin add cordova-plugin-device
Overview
Before implementing the KYC screen, you need to add the initiateActivatedCustomerKYC() API method to the IDV service layer. This method initiates the post-login KYC workflow and returns a promise.
Implement initiateActivatedCustomerKYC API
Add the following method to rdnaIDVService.js:
// www/src/uniken/services/idv/rdnaIDVService.js

/**
 * Initiate Activated Customer KYC
 *
 * Initiates post-login KYC workflow for already activated customers.
 * This API triggers the complete IDV flow with workflow 6 (RDNA_IDV_POSTLOGIN_KYC)
 * and challenge mode 9 (post-login).
 *
 * @param {string} reason - Reason for KYC initiation (e.g., "Post Login KYC", "Compliance Verification")
 * @returns {Promise<Object>} Promise that resolves with sync response on successful initiation
 *
 * Flow:
 * 1. SDK initiates post-login KYC workflow (workflow 6, mode 9)
 * 2. SDK automatically triggers IDV workflow events:
 *    - getIDVDocumentScanProcessStartConfirmation
 *    - getIDVConfirmDocumentDetails
 *    - getIDVSelfieProcessStartConfirmation
 *    - getIDVSelfieConfirmation
 *    - getIDVBiometricOptInConsent
 * 3. After completion or cancellation, SDK triggers:
 *    - onActivatedCustomerKYCResponse event
 *
 * Success Response:
 * - error.longErrorCode = 0
 *
 * Error Responses:
 * - Sync error: error.longErrorCode !== 0
 * - Backend error: Received in onActivatedCustomerKYCResponse event
 */
async initiateActivatedCustomerKYC(reason) {
  return new Promise((resolve, reject) => {
    console.log('RdnaIDVService - Initiating activated customer KYC:', JSON.stringify({
      reason
    }, null, 2));

    com.uniken.rdnaplugin.RdnaClient.initiateActivatedCustomerKYC(
      (response) => {
        console.log('RdnaIDVService - InitiateActivatedCustomerKYC sync callback received');

        const result = JSON.parse(response);
        console.log('RdnaIDVService - initiateActivatedCustomerKYC sync response:', JSON.stringify({
          longErrorCode: result.error?.longErrorCode,
          shortErrorCode: result.error?.shortErrorCode,
          errorString: result.error?.errorString
        }, null, 2));

        // Check sync error
        if (result.error && result.error.longErrorCode === 0) {
          console.log('RdnaIDVService - Activated customer KYC initiated successfully');
          console.log('RdnaIDVService - SDK will trigger IDV workflow events');
          console.log('RdnaIDVService - Workflow: 6 (RDNA_IDV_POSTLOGIN_KYC)');
          console.log('RdnaIDVService - Challenge Mode: 9 (post-login)');
          resolve(result);
        } else {
          console.error('RdnaIDVService - Activated customer KYC initiation failed');
          console.error('RdnaIDVService - Error Code:', result.error?.longErrorCode);
          console.error('RdnaIDVService - Error String:', result.error?.errorString);
          reject(result);
        }
      },
      (error) => {
        console.error('RdnaIDVService - initiateActivatedCustomerKYC error callback');
        const result = JSON.parse(error);
        reject(result);
      },
      [reason]
    );
  });
}
Key Points
- Workflow 6: The API automatically uses
RDNA_IDV_POSTLOGIN_KYCworkflow - Challenge Mode 9: All subsequent IDV events will use post-login challenge mode
- Sync Callback: Immediate response confirming KYC initiation started
- Async Event: Final result comes via
onActivatedCustomerKYCResponseevent - Promise Pattern: Returns promise for easy async/await usage
- Global SDK Object: Uses
com.uniken.rdnaplugin.RdnaClient(no imports needed)
Understanding Service Auto-Initialization
Unlike React Native which uses ES6 imports, Cordova requires manual service initialization. The service and event manager use an auto-initialization pattern to ensure they're ready before any SDK events fire.
Auto-Initialization Pattern:
// rdnaIDVService.js
class RdnaIDVService {
  constructor() {
    if (RdnaIDVService.instance) {
      return RdnaIDVService.instance;
    }

    console.log('RdnaIDVService - Initializing service (auto-initialization on module load)');
    this.eventManager = rdnaIDVEventManager;
    RdnaIDVService.instance = this;
  }

  static getInstance() {
    if (!RdnaIDVService.instance) {
      RdnaIDVService.instance = new RdnaIDVService();
    }
    return RdnaIDVService.instance;
  }
}

// Auto-instantiate singleton when script loads
const rdnaIDVService = RdnaIDVService.getInstance();
Why Auto-Initialize?
- Race Condition Prevention: Event listeners register BEFORE SDK fires any events
- Singleton Pattern: Guarantees only one instance exists globally
- Immediate Availability: Service ready as soon as JavaScript loads
- No Manual Setup: Screens can use service immediately without initialization calls
Script Loading Order in index.html
Cordova uses synchronous script loading, so order is CRITICAL. Load scripts in the wrong order and you'll get ReferenceError: rdnaIDVService is not defined.
Correct Loading Order:
<!-- CRITICAL: Load in this exact order! -->

<!-- 1. Core Services (must load FIRST) -->
<script type="text/javascript" src="src/uniken/services/idv/rdnaIDVEventManager.js"></script>
<script type="text/javascript" src="src/uniken/services/idv/rdnaIDVService.js"></script>

<!-- 2. Global Providers (depends on services) -->
<script type="text/javascript" src="src/uniken/providers/idv/SDKIDVEventProvider.js"></script>

<!-- 3. App Initializer (initializes providers - MUST load before screens) -->
<script type="text/javascript" src="src/uniken/AppInitializer.js"></script>

<!-- 4. Screens (load LAST - they use services) -->
<script type="text/javascript" src="src/tutorial/screens/idv/activatedCustomerKyc/ActivatedCustomerKYCScreen.js"></script>
<script type="text/javascript" src="src/tutorial/screens/idv/IDVDocumentProcessStartConfirmationScreen.js"></script>
<!-- ... other IDV screens ... -->
Loading Order Rationale:
1. rdnaIDVEventManager.js loads
   → Registers document.addEventListener listeners
   → Auto-creates singleton instance

2. rdnaIDVService.js loads
   → Gets reference to event manager
   → Wraps SDK APIs in Promise-based methods
   → Auto-creates singleton instance

3. SDKIDVEventProvider.js loads
   → Accesses rdnaIDVService (already loaded)
   → Registers global event handlers
   → Auto-creates singleton instance

4. AppInitializer.js loads
   → Calls SDKIDVEventProvider.initialize()
   → Sets up navigation service references

5. Screen files load
   → Access rdnaIDVService (safe - already loaded)
   → Register screen-level event handlers
   → Export to window object
Overview
Implement the event listener and handler for onActivatedCustomerKYCResponse in the IDV event manager. This handles the native event from the SDK and invokes the registered callback.
Implement onActivatedCustomerKYCResponse Event Handler
Update rdnaIDVEventManager.js to add the KYC response event:
// www/src/uniken/services/idv/rdnaIDVEventManager.js

class RdnaIDVEventManager {
  constructor() {
    // ... existing constructor code

    // 🆕 Add handler property
    this.activatedCustomerKYCResponseHandler = null;

    // Auto-register listeners on construction
    this.registerEventListeners();
  }

  /**
   * Set handler for activated customer KYC response event
   *
   * This handler will be invoked when the SDK triggers onActivatedCustomerKYCResponse event.
   *
   * @param {Function} callback - Callback function to handle KYC response event
   */
  setActivatedCustomerKYCResponseHandler(callback) {
    console.log('RdnaIDVEventManager - Setting activated customer KYC response handler');
    this.activatedCustomerKYCResponseHandler = callback;
  }

  /**
   * Handle onActivatedCustomerKYCResponse event from SDK
   *
   * This event is triggered when:
   * 1. KYC workflow completes successfully (all IDV steps completed)
   * 2. User cancels during IDV flow (error code 240 - User Cancelled)
   * 3. Backend returns an error during KYC initiation or processing
   *
   * Event Flow:
   * - SDK → Native Bridge → JavaScript Event → This Handler → Registered Callback
   *
   * Handler Responsibilities:
   * 1. Parse JSON response from native SDK
   * 2. Log key fields (userID, sessionID, error, status)
   * 3. Invoke registered callback with parsed data
   * 4. Warn if no callback registered
   *
   * @param {Object} event - Event object containing response data from native SDK
   */
  onActivatedCustomerKYCResponse(event) {
    console.log('RdnaIDVEventManager - Activated customer KYC response event received');

    try {
      const response = event.response || event.detail || event;
      console.log('RdnaIDVEventManager - onActivatedCustomerKYCResponse response:', JSON.stringify(response, null, 2));

      const data = typeof response === 'string' ? JSON.parse(response) : response;

      // Log event data for debugging
      console.log('RdnaIDVEventManager - User ID:', data.userID);
      console.log('RdnaIDVEventManager - Session ID:', data.sessionID);
      console.log('RdnaIDVEventManager - Reason:', data.reason);
      console.log('RdnaIDVEventManager - Error Code:', data.error?.longErrorCode);
      console.log('RdnaIDVEventManager - Error String:', data.error?.errorString);
      console.log('RdnaIDVEventManager - Status Code:', data.status?.statusCode);
      console.log('RdnaIDVEventManager - Status Message:', data.status?.statusMessage);

      // Invoke registered callback if exists
      if (this.activatedCustomerKYCResponseHandler) {
        console.log('RdnaIDVEventManager - Invoking activated customer KYC response handler');
        this.activatedCustomerKYCResponseHandler(data);
      } else {
        console.warn('RdnaIDVEventManager - No handler registered for activated customer KYC response');
        console.warn('RdnaIDVEventManager - Event data will be lost if not handled');
      }
    } catch (error) {
      console.error('RdnaIDVEventManager - Failed to parse activated customer KYC response:', error);
    }
  }

  /**
   * Register all IDV event listeners
   *
   * Subscribes to native SDK events via document.addEventListener.
   */
  registerEventListeners() {
    if (this._initialized) {
      console.log('RdnaIDVEventManager - Already initialized, skipping event listener registration');
      return;
    }

    console.log('RdnaIDVEventManager - Registering native IDV event listeners');

    // ... existing event listeners (document scan, selfie, consent)

    // 🆕 Activated Customer KYC Response Event
    document.addEventListener(
      'onActivatedCustomerKYCResponse',
      this.onActivatedCustomerKYCResponse.bind(this),
      false
    );

    this._initialized = true;
    console.log('RdnaIDVEventManager - Native IDV event listeners registered');
  }

  /**
   * Cleanup all event listeners
   */
  cleanup() {
    console.log('RdnaIDVEventManager - Cleaning up event listeners and handlers');

    // ... existing cleanup code

    // 🆕 Remove KYC response listener
    document.removeEventListener('onActivatedCustomerKYCResponse', this.onActivatedCustomerKYCResponse.bind(this), false);

    // 🆕 Clear KYC response handler
    this.activatedCustomerKYCResponseHandler = null;

    this._initialized = false;
    console.log('RdnaIDVEventManager - Cleanup completed');
  }
}

// Auto-instantiate singleton
const rdnaIDVEventManager = RdnaIDVEventManager.getInstance();
Event Manager Features
- Event Listener Registration: Subscribes to
onActivatedCustomerKYCResponsenative event - JSON Parsing: Parses native response into JavaScript object
- Comprehensive Logging: Logs all key fields for debugging
- Handler Invocation: Calls registered callback with parsed data
- Error Handling: Catches and logs parsing errors
- Cleanup Support: Properly removes listeners to prevent memory leaks
- Cordova Pattern: Uses
document.addEventListener()instead of NativeEventEmitter
Overview
The Cordova app uses a persistent drawer menu in index.html. Add the KYC menu item to the drawer content.
Update index.html with KYC Menu Item
Add the KYC menu item to the drawer navigation list:
<!-- www/index.html -->

<!-- Drawer Menu (slides in from left) -->
<nav id="drawer-menu" class="drawer-menu">
  <div class="drawer-header">
    <h2 class="drawer-title">REL-ID MFA</h2>
    <button id="drawer-close-btn" class="drawer-close-btn">✕</button>
  </div>
  <div class="drawer-content">
    <div id="drawer-user-info" class="drawer-user-info" style="display: none;">
      <p class="drawer-user-label">Logged in as:</p>
      <p id="drawer-username" class="drawer-username">-</p>
    </div>
    <ul class="drawer-nav">
      <li><a href="#" id="drawer-dashboard-link" class="drawer-link">🏠 Dashboard</a></li>
      <li>
        <a href="#" id="drawer-language-link" class="drawer-link drawer-language-link">
          <span class="drawer-language-main">🌐 Change Language</span>
          <span id="drawer-current-language" class="drawer-language-current">English</span>
        </a>
      </li>
      <li><a href="#" id="drawer-notifications-link" class="drawer-link">🔔 Get Notifications</a></li>
      <li><a href="#" id="drawer-notification-history-link" class="drawer-link">📜 Notification History</a></li>
      <li><a href="#" id="drawer-device-mgmt-link" class="drawer-link">📱 Device Management</a></li>
      <li><a href="#" id="drawer-lda-toggling-link" class="drawer-link">🔐 LDA Toggling</a></li>
      <li><a href="#" id="drawer-data-signing-link" class="drawer-link">🔏 Data Signing</a></li>
      <li id="drawer-update-password-item" style="display: none;">
        <a href="#" id="drawer-update-password-link" class="drawer-link">🔑 Update Password</a>
      </li>
      <!-- 🆕 Add KYC menu item -->
      <li><a href="#" id="drawer-kyc-link" class="drawer-link">🆔 Activated Customer KYC</a></li>
      <li><a href="#" id="drawer-logout-link" class="drawer-link logout-link">🚪 Log Out</a></li>
    </ul>
  </div>
</nav>
Add KYC Screen Template to index.html
Add the HTML template for the Activated Customer KYC screen:
<!-- www/index.html -->

<!-- Activated Customer KYC Screen Template -->
<template id="ActivatedCustomerKYC-template">
  <div class="screen-container">
    <!-- Header with Menu Button -->
    <div class="dashboard-header">
      <button id="kyc-menu-btn" class="menu-button">☰</button>
      <h2 class="dashboard-title">Activated Customer KYC</h2>
      <div class="header-spacer"></div>
    </div>

    <div class="kyc-content">
      <!-- KYC Information Card -->
      <div class="card">
        <h2 class="card-title">Identity Verification</h2>
        <p class="card-description">
          Complete your identity verification by scanning a government-issued ID and taking a selfie.
          This process helps us verify your identity and comply with KYC (Know Your Customer) regulations.
        </p>

        <!-- What You'll Need -->
        <div class="kyc-requirements">
          <h3 class="requirements-title">What You'll Need:</h3>
          <ul class="requirements-list">
            <li>📄 Government-issued ID (Passport, Driver's License, National ID, etc.)</li>
            <li>📱 Good lighting for clear document capture</li>
            <li>🤳 Front-facing camera for selfie verification</li>
            <li>⏱️ Approximately 2-3 minutes to complete</li>
          </ul>
        </div>

        <!-- Process Steps -->
        <div class="kyc-process">
          <h3 class="requirements-title">Verification Process:</h3>
          <ul class="requirements-list">
            <li><strong>Step 1 - Document Scan:</strong> Capture clear photos of your government-issued ID</li>
            <li><strong>Step 2 - Review Details:</strong> Verify the information extracted from your document</li>
            <li><strong>Step 3 - Selfie Capture:</strong> Take a selfie for biometric matching</li>
            <li><strong>Step 4 - Biometric Consent:</strong> Provide consent for secure biometric template storage</li>
          </ul>
        </div>
      </div>

      <!-- Status Banner (hidden by default) -->
      <div id="kyc-status-banner" class="status-banner" style="display: none;">
        <p id="kyc-status-message" class="status-message"></p>
      </div>

      <!-- Start KYC Button -->
      <div class="button-container">
        <button id="start-kyc-btn" class="primary-button">
          Start KYC Verification
        </button>
      </div>

      <!-- Privacy & Security Info -->
      <div class="card info-card">
        <h3 class="info-card-title">🔒 Privacy & Security</h3>
        <p class="info-card-text">
          Your identity documents and biometric data are encrypted and securely transmitted using industry-standard encryption protocols.
          We comply with all applicable data protection regulations including GDPR and CCPA. Your data is never shared with third parties
          without your explicit consent.
        </p>
      </div>

      <!-- Additional Help -->
      <div class="card info-card">
        <h3 class="info-card-title">💡 Tips for Best Results</h3>
        <ul class="info-card-list">
          <li>Ensure your ID is not expired</li>
          <li>Capture photos in a well-lit area</li>
          <li>Avoid glare or shadows on the document</li>
          <li>Remove glasses for selfie capture</li>
          <li>Look directly at the camera</li>
        </ul>
      </div>
    </div>
  </div>
</template>
Load KYC Screen Script
Add the screen script to index.html after other IDV screens:
<!-- www/index.html -->

<!-- IDV Screens -->
<script type="text/javascript" src="src/tutorial/screens/idv/IDVDocumentProcessStartConfirmationScreen.js"></script>
<script type="text/javascript" src="src/tutorial/screens/idv/IDVConfirmDocumentDetailsScreen.js"></script>
<script type="text/javascript" src="src/tutorial/screens/idv/IDVSelfieProcessStartConfirmationScreen.js"></script>
<script type="text/javascript" src="src/tutorial/screens/idv/IDVSelfieConfirmationScreen.js"></script>
<script type="text/javascript" src="src/tutorial/screens/idv/IDVBiometricOptInConsentScreen.js"></script>
<!-- 🆕 Add KYC Screen -->
<script type="text/javascript" src="src/tutorial/screens/idv/activatedCustomerKyc/ActivatedCustomerKYCScreen.js"></script>
Verify Drawer Menu Implementation
Test the complete drawer menu integration:
- Login with activated credentials → Navigate to Dashboard
- Open drawer menu → Swipe from left edge OR tap hamburger icon (☰) in header
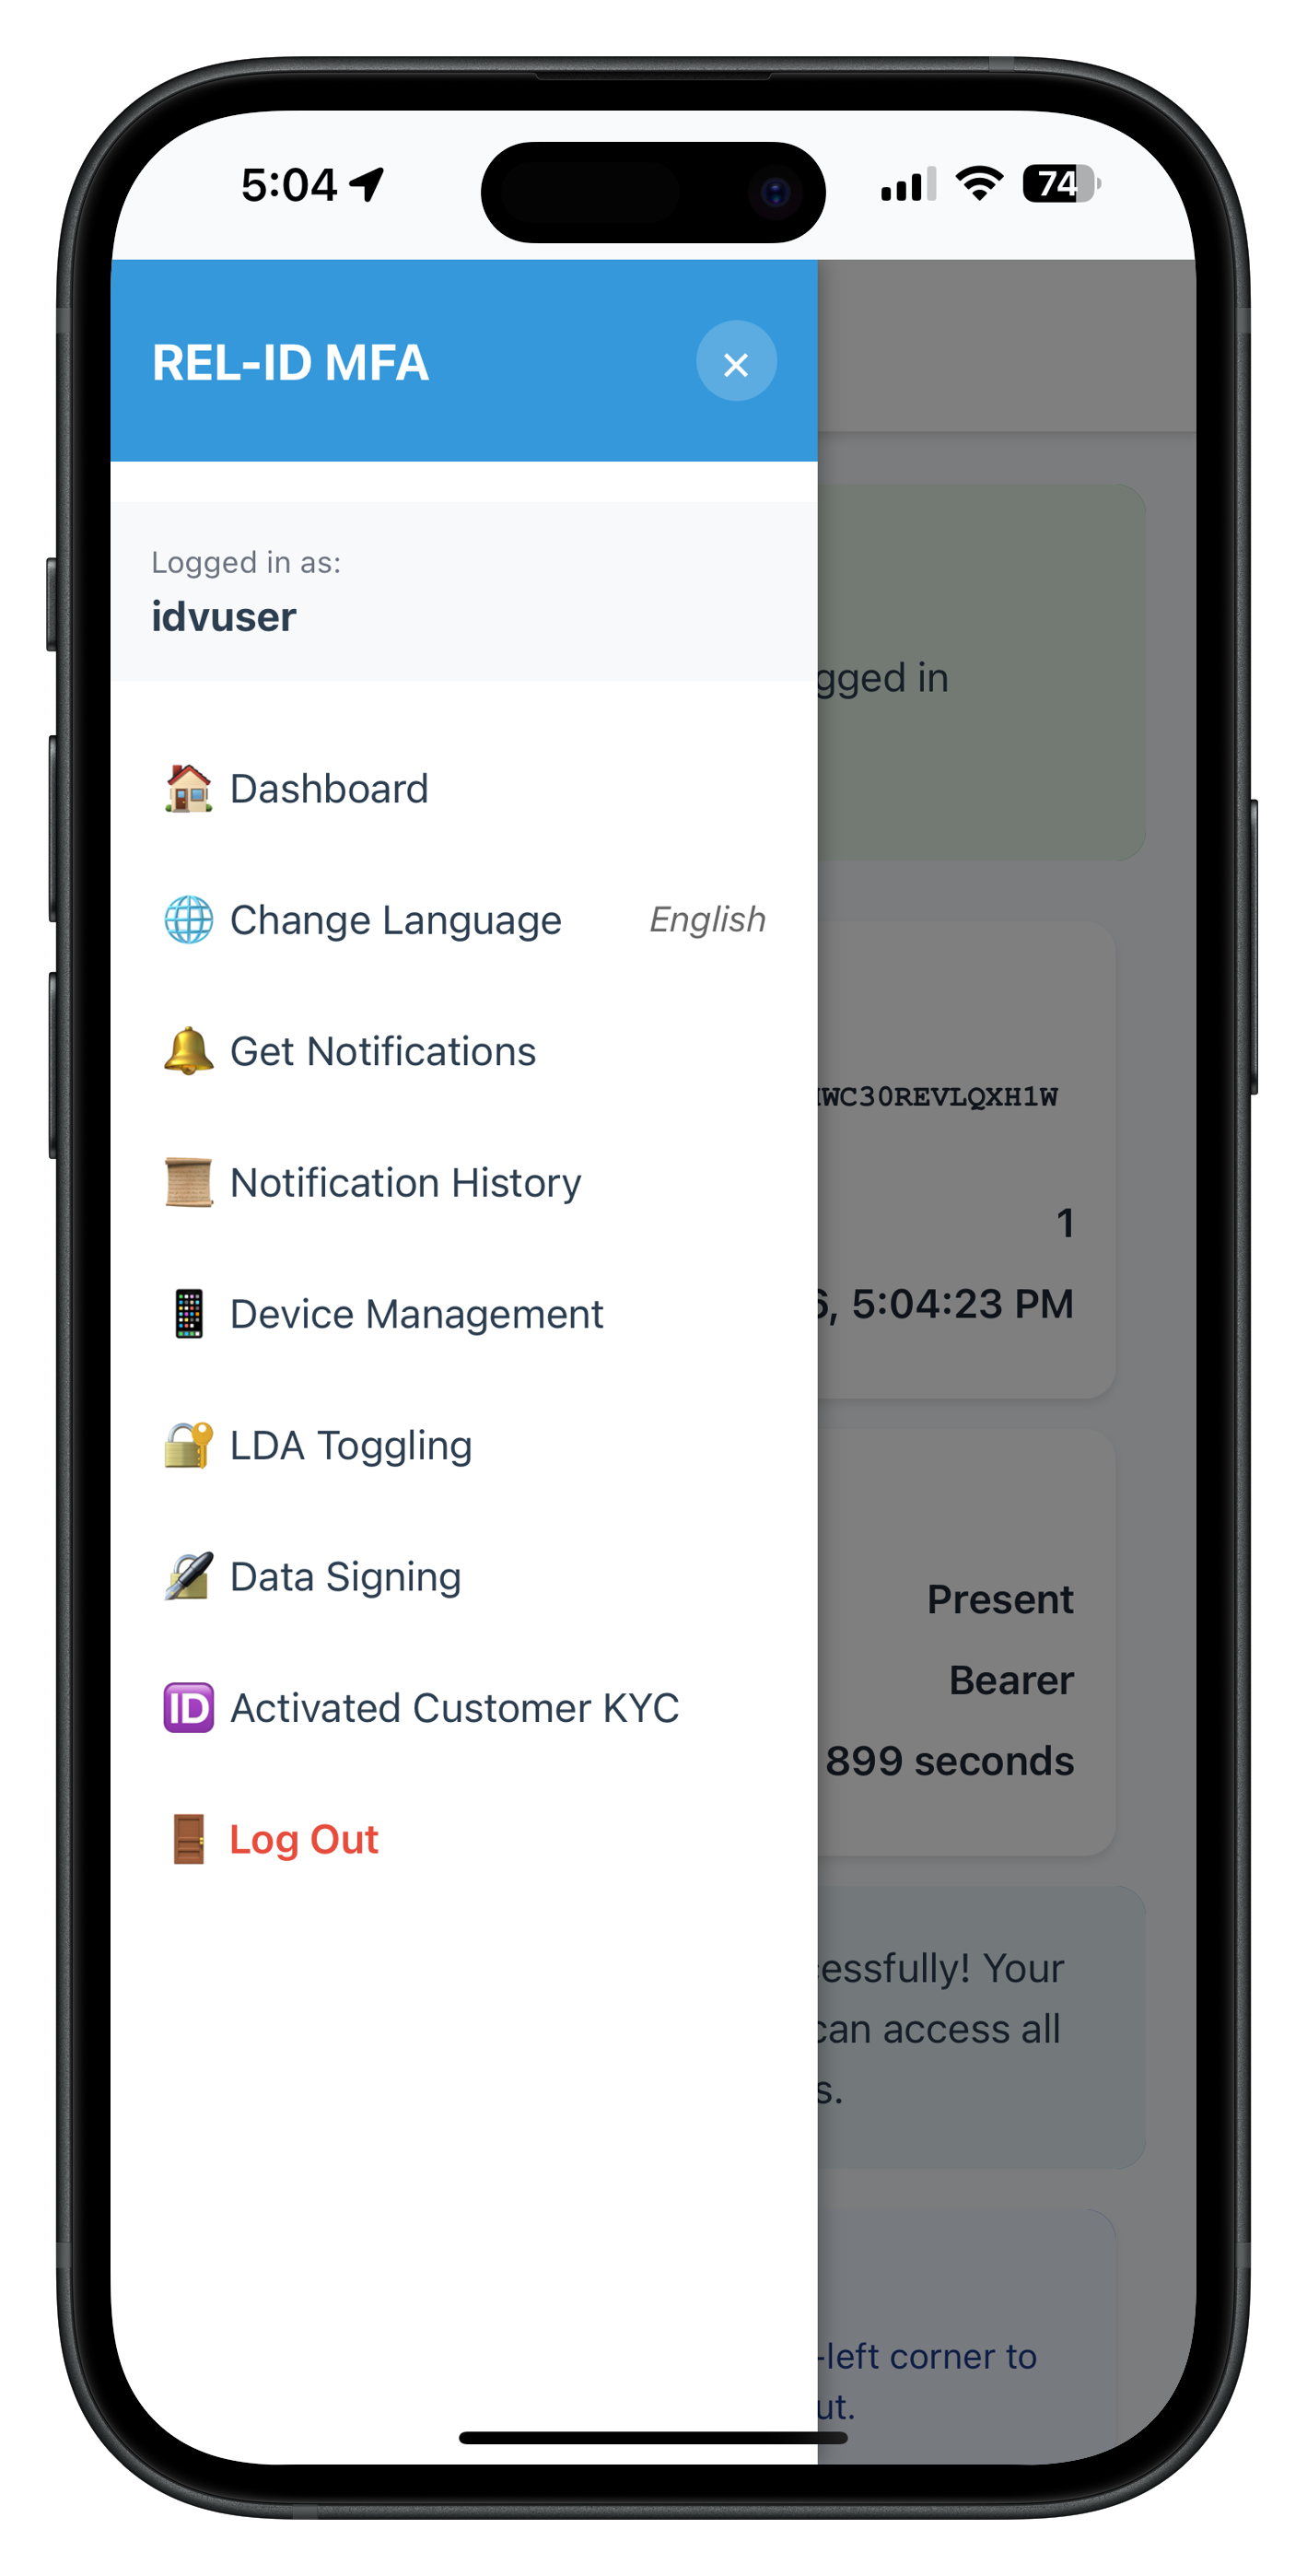
- Verify drawer opens → Drawer slides in from left showing user info and menu items
- Locate KYC menu item → "🆔 Activated Customer KYC"
- Verify item position → Between "Update Password" and "Log Out"
- Tap KYC menu item → Should navigate to ActivatedCustomerKYCScreen
- Verify navigation → Drawer closes, KYC screen displays
- Check console → Should show "Registering persistent event handler"
- Test menu button → Tap hamburger icon (☰) in KYC screen header
- Verify drawer opens → Drawer slides in showing menu (confirms drawer works)
Test After KYC Flow:
- Complete KYC flow → Start KYC, complete all steps, see success alert
- Return to KYC screen → Handler navigates back to ActivatedCustomerKYCScreen
- Test menu button again → Tap hamburger icon (☰)
- Verify drawer still works → Drawer opens properly (confirms SPA pattern works)
Drawer Menu UI Preview
Overview
The ActivatedCustomerKYCScreen is the entry point for post-login KYC verification. It demonstrates the persistent event handler pattern and dual validation.
Key Features
- KYC Initiation:
initiateActivatedCustomerKYC()API with workflow 6 - Persistent Event Handler: Screen-level handler (stays active when unfocused)
- Screen State Management: Object properties for state instead of React hooks
- Dual Validation: Two-tier validation checking both sync error and backend status
- Navigation Back: Handler always navigates back to KYC screen before showing alert
- Success/Error Alerts: Clear feedback with Dashboard navigation option
- SPA Lifecycle:
onContentLoaded()method called by NavigationService
Implement ActivatedCustomerKYCScreen.js
Create the KYC screen module:
// www/src/tutorial/screens/idv/activatedCustomerKyc/ActivatedCustomerKYCScreen.js

/**
 * Activated Customer KYC Screen - SPA Module
 *
 * Entry point for post-login KYC (Know Your Customer) verification.
 * Allows logged-in users to complete identity verification using the IDV SDK.
 *
 * Features:
 * - KYC information and requirements display
 * - "Start KYC Verification" button to initiate IDV workflow
 * - Success/error status display after KYC completion
 * - Screen-level event handler for KYC completion
 *
 * SDK Integration:
 * - Calls rdnaIDVService.initiateActivatedCustomerKYC(reason)
 * - Registers event handler for onActivatedCustomerKYCResponse
 * - Receives KYC completion status via event
 * - Navigates through standard IDV workflow (document → selfie → consent)
 *
 * IDV Workflow:
 * 1. User clicks "Start KYC Verification"
 * 2. initiateActivatedCustomerKYC('Post Login KYC') called
 * 3. SDK fires onActivatedCustomerKYCResponse (first time - workflow initiated)
 * 4. SDK auto-triggers IDV events: document scan → selfie → consent
 * 5. After IDV completion, SDK fires onActivatedCustomerKYCResponse (second time - final result)
 * 6. Screen handler navigates back to this screen with result
 * 7. Success/error alert displayed
 *
 * SPA Pattern:
 * - onContentLoaded(params) called when navigated to
 * - setupEventListeners() attaches DOM handlers and event handler
 * - handleStartKYC() initiates KYC workflow
 * - handleActivatedCustomerKYCResponse() processes completion event
 * - No page reload, just content swap
 */

const ActivatedCustomerKYCScreen = {
  /**
   * Current state (replaces React useState)
   */
  state: {
    userID: '',
    sessionID: '',
    isProcessing: false,
    kycResult: null
  },

  /**
   * Called when screen content is loaded into #app-content
   *
   * @param {Object} params - Navigation parameters
   * @param {string} params.userID - User identifier
   * @param {string} params.sessionID - Session ID from SDK
   * @param {Object} params.kycResult - KYC completion result (if returning from workflow)
   */
  onContentLoaded(params) {
    console.log('ActivatedCustomerKYCScreen - Content loaded with params:', JSON.stringify(params, null, 2));

    // Store state from params
    this.state = {
      userID: params.userID || '',
      sessionID: params.sessionID || '',
      isProcessing: false,
      kycResult: params.kycResult || null
    };

    // Setup DOM event listeners and SDK event handler
    this.setupEventListeners();

    // If returning with KYC result, display it
    if (this.state.kycResult) {
      this.displayKYCResult(this.state.kycResult);
    }
  },

  /**
   * Attach event listeners to DOM elements and register SDK event handler
   */
  setupEventListeners() {
    const menuBtn = document.getElementById('kyc-menu-btn');
    const startKYCBtn = document.getElementById('start-kyc-btn');

    if (menuBtn) {
      menuBtn.onclick = () => {
        console.log('ActivatedCustomerKYCScreen - Menu button clicked, opening drawer');
        NavigationService.openDrawer();
      };
    }

    if (startKYCBtn) {
      startKYCBtn.onclick = () => {
        this.handleStartKYC();
      };
    }

    // CRITICAL: Register screen-level event handler for KYC completion
    // This handler persists across the entire IDV workflow and receives the final result
    const eventManager = rdnaIDVService.getEventManager();
    eventManager.setActivatedCustomerKYCResponseHandler(
      this.handleActivatedCustomerKYCResponse.bind(this)
    );

    console.log('ActivatedCustomerKYCScreen - Event handler registered for onIDVActivatedCustomerKYCResponse');
  },

  /**
   * Handle "Start KYC Verification" button click
   *
   * Initiates the post-login KYC workflow by calling initiateActivatedCustomerKYC.
   * This triggers the IDV flow: document scan → selfie → biometric consent.
   */
  async handleStartKYC() {
    if (this.state.isProcessing) {
      console.log('ActivatedCustomerKYCScreen - KYC already in progress, ignoring button click');
      return;
    }

    console.log('ActivatedCustomerKYCScreen - Starting KYC verification');
    this.setProcessing(true);
    this.hideStatusBanner();

    try {
      const syncResponse = await rdnaIDVService.initiateActivatedCustomerKYC('Post Login KYC');
      console.log('ActivatedCustomerKYCScreen - initiateActivatedCustomerKYC sync response:', JSON.stringify({
        longErrorCode: syncResponse.error?.longErrorCode,
        shortErrorCode: syncResponse.error?.shortErrorCode,
        errorString: syncResponse.error?.errorString
      }, null, 2));

      // Sync response successful - SDK will trigger IDV events
      console.log('ActivatedCustomerKYCScreen - KYC initiated, IDV workflow will begin automatically');

      // Note: The actual result will come via onIDVActivatedCustomerKYCResponse event
      // after the entire IDV workflow (document + selfie + consent) completes

    } catch (error) {
      console.error('ActivatedCustomerKYCScreen - initiateActivatedCustomerKYC error:', error);
      this.setProcessing(false);

      const errorMessage = error.error?.errorString || 'Failed to initiate KYC verification';
      this.showStatusBanner(errorMessage, 'error');
    }
  },

  /**
   * Handle onIDVActivatedCustomerKYCResponse event
   *
   * This event is fired TWICE during the flow:
   * 1. First fire: After initiateActivatedCustomerKYC is called (workflow initiated)
   * 2. Second fire: After the complete IDV workflow finishes (final result)
   *
   * We only navigate back and display results on the SECOND fire (when we have final status).
   *
   * @param {Object} data - KYC response event data
   * @param {string} data.userID - User identifier
   * @param {string} data.sessionID - Session ID
   * @param {string} data.reason - KYC reason
   * @param {Object} data.status - Status object with statusCode and statusMessage
   * @param {Object} data.error - Error object with longErrorCode and errorString
   */
  handleActivatedCustomerKYCResponse(data) {
    console.log('ActivatedCustomerKYCScreen - onIDVActivatedCustomerKYCResponse event received:', JSON.stringify(data, null, 2));

    // First fire: Workflow initiated (no status object yet, just error code validation)
    // We log this but don't navigate or display anything
    if (!data.status || (!data.status.statusCode && data.error?.longErrorCode === 0)) {
      console.log('ActivatedCustomerKYCScreen - KYC workflow initiated (first event), IDV flow will continue');
      return;
    }

    // Second fire: Final result (has status object with statusCode)
    console.log('ActivatedCustomerKYCScreen - Final KYC result received, navigating back to screen');

    // Navigate back to this screen with the result
    // This will trigger onContentLoaded with kycResult in params
    NavigationService.navigate('ActivatedCustomerKYC', {
      userID: this.state.userID,
      sessionID: this.state.sessionID,
      kycResult: data
    });
  },

  /**
   * Display KYC result (success or error) with alert dialog
   *
   * Shows an alert dialog matching Cordova's pattern:
   * - Error checking priority:
   *   1. First check error.longErrorCode - if not 0, it's a sync error
   *   2. Then check status.statusCode - if exists and NOT 100 or 0, it's a backend error
   *   3. Otherwise it's success
   *
   * @param {Object} data - KYC result data from event
   */
  displayKYCResult(data) {
    console.log('ActivatedCustomerKYCScreen - Displaying KYC result');
    this.setProcessing(false);

    const errorCode = data.error?.longErrorCode;
    const errorString = data.error?.errorString;
    const statusCode = data.status?.statusCode;
    const statusMessage = data.status?.statusMessage;

    console.log('ActivatedCustomerKYCScreen - Response validation:', JSON.stringify({
      errorCode,
      errorString,
      statusCode,
      statusMessage
    }, null, 2));

    // Small delay to ensure navigation completes before showing alert
    setTimeout(() => {
      // Check for sync error first
      if (errorCode !== 0) {
        // Sync error case
        console.error('ActivatedCustomerKYCScreen - Sync error detected:', errorCode);

        alert(
          'Error\n\n' +
          `KYC initiation failed: ${errorString || 'Failed to initiate KYC verification'} (${errorCode})\n\n` +
          'Click OK to go to Dashboard.'
        );

        console.log('ActivatedCustomerKYCScreen - Navigating to Dashboard after sync error');
        NavigationService.navigate('Dashboard', this.state);
      } else if (statusCode && statusCode !== 100 && statusCode !== 0) {
        // Backend error case (status code exists and is not 100 or 0)
        console.error('ActivatedCustomerKYCScreen - Backend error detected:', statusCode);

        alert(
          'Error\n\n' +
          `KYC initiation failed: ${statusMessage || 'Failed to initiate KYC verification'} (${statusCode})\n\n` +
          'Click OK to go to Dashboard.'
        );

        console.log('ActivatedCustomerKYCScreen - Navigating to Dashboard after backend error');
        NavigationService.navigate('Dashboard', this.state);
      } else {
        // Success case
        console.log('ActivatedCustomerKYCScreen - The KYC process has been completed successfully');

        alert(
          'Success\n\n' +
          `The KYC process has been completed successfully. ${statusMessage || ''}\n\n` +
          'Click OK to go to Dashboard.'
        );

        console.log('ActivatedCustomerKYCScreen - Navigating to Dashboard');
        NavigationService.navigate('Dashboard', this.state);
      }
    }, 300);

    // Clear kycResult from state after displaying
    this.state.kycResult = null;
  },

  /**
   * Show status banner with message
   *
   * @param {string} message - Message to display
   * @param {string} type - Banner type ('success' or 'error')
   */
  showStatusBanner(message, type) {
    const statusBanner = document.getElementById('kyc-status-banner');
    const statusMessage = document.getElementById('kyc-status-message');

    if (statusBanner && statusMessage) {
      statusMessage.textContent = message;

      // Remove existing type classes
      statusBanner.classList.remove('status-banner-success', 'status-banner-error');

      // Add appropriate type class
      if (type === 'success') {
        statusBanner.classList.add('status-banner-success');
      } else if (type === 'error') {
        statusBanner.classList.add('status-banner-error');
      }

      statusBanner.style.display = 'block';
    }
  },

  /**
   * Hide status banner
   */
  hideStatusBanner() {
    const statusBanner = document.getElementById('kyc-status-banner');
    if (statusBanner) {
      statusBanner.style.display = 'none';
    }
  },

  /**
   * Set processing state
   *
   * @param {boolean} isProcessing - Whether KYC is processing
   */
  setProcessing(isProcessing) {
    this.state.isProcessing = isProcessing;

    // Disable/enable start button during processing
    const startKYCBtn = document.getElementById('start-kyc-btn');
    if (startKYCBtn) {
      startKYCBtn.disabled = isProcessing;
      startKYCBtn.textContent = isProcessing ? 'Processing...' : 'Start KYC Verification';
      startKYCBtn.style.opacity = isProcessing ? '0.6' : '1';
    }
  }
};

// Expose to global scope for NavigationService
window.ActivatedCustomerKYCScreen = ActivatedCustomerKYCScreen;
Key Implementation Patterns
1. Persistent Event Handler Registration
// Registered in setupEventListeners(), stays active across navigation
setupEventListeners() {
  const eventManager = rdnaIDVService.getEventManager();
  eventManager.setActivatedCustomerKYCResponseHandler(
    this.handleActivatedCustomerKYCResponse.bind(this)
  );
}
2. SPA Lifecycle Pattern
// Called by NavigationService when screen becomes active
onContentLoaded(params) {
  // Initialize state from params
  this.state = { ...params };

  // Setup DOM handlers and SDK event handlers
  this.setupEventListeners();

  // Display result if returning with kycResult
  if (this.state.kycResult) {
    this.displayKYCResult(this.state.kycResult);
  }
}
3. Dual Validation Pattern
// 1. Check sync error first
if (errorCode !== 0) {
  // Show sync error
}
// 2. Check backend status code
else if (statusCode && statusCode !== 100 && statusCode !== 0) {
  // Show backend error
}
// 3. Success
else {
  // Show success
}
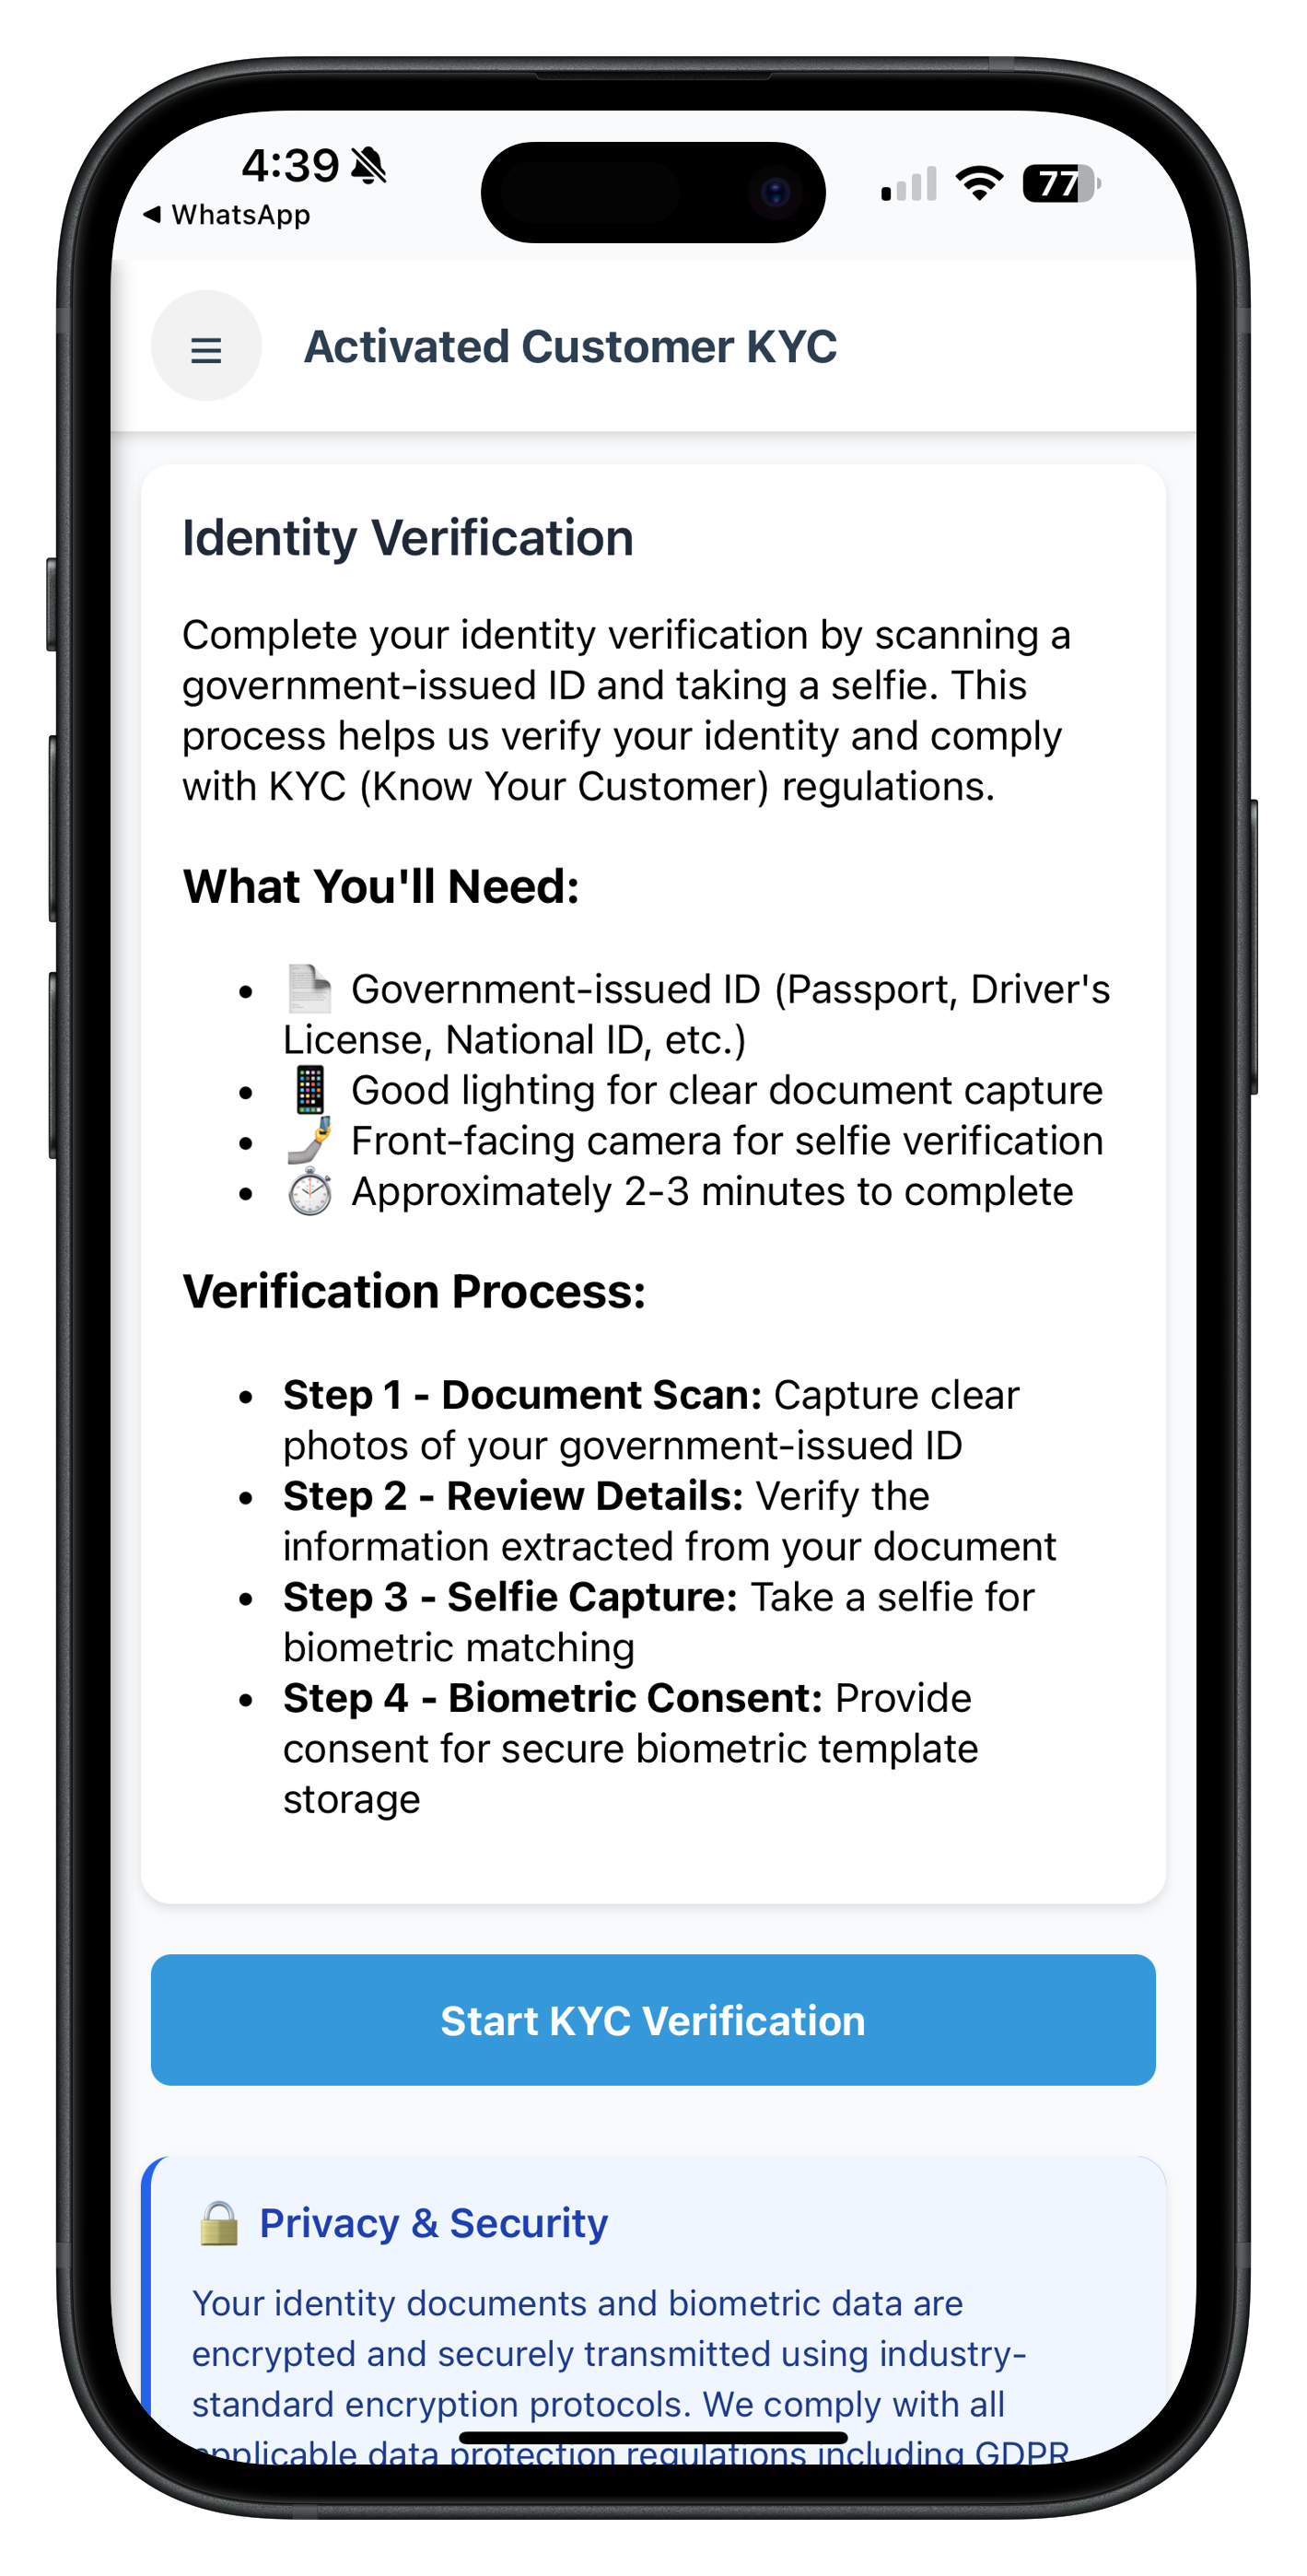
ActivatedCustomerKYC Screen UI Preview
Testing ActivatedCustomerKYC Screen
Verify the implementation:
- Navigate from drawer → Open drawer, tap "🆔 Activated Customer KYC"
- View KYC information → Screen displays requirements and bullet points
- Click "Start KYC Verification" → Button shows "Processing..." state
- Handler registered → Console shows "Event handler registered"
- SDK initiates workflow → Document scan event should trigger next
Test Success Flow:
- Complete all IDV steps → Document scan, selfie capture, consent
- Wait for completion → onActivatedCustomerKYCResponse event triggered
- Verify alert → Success alert appears with "Click OK to go to Dashboard"
- Tap OK → Navigate to Dashboard, KYC completed
Test Cancellation Flow:
- Cancel during IDV → Close button on any IDV screen
- Verify event → onActivatedCustomerKYCResponse with error 240
- Verify navigation → Screen navigates back to ActivatedCustomerKYC
- Verify alert → Error alert shows "User Cancelled (240)"
- Verify retry → Button re-enabled, can start KYC again
Overview
The document scan process for post-login KYC uses workflow 6 (RDNA_IDV_POSTLOGIN_KYC) and challenge mode 9. The close button behavior is different from pre-login flow.
Document Scan Start Confirmation
When SDK triggers getIDVDocumentScanProcessStartConfirmation event:
IDVDocumentProcessStartConfirmationScreen.js Key Changes
// Event handler receives workflow 6
const idvWorkflow = this.state.idvWorkflow;
// idvWorkflow = 6 for post-login KYC

// User confirms to start document scan
async handleStartDocumentScan() {
  try {
    console.log('IDVDocumentProcessStart - Starting document scan with workflow:', idvWorkflow);

    // Pass workflow 6 to SDK
    await rdnaIDVService.setIDVDocumentScanProcessStartConfirmation(
      true, // isConfirm
      idvWorkflow // 6 for post-login KYC
    );

    console.log('IDVDocumentProcessStart - Document scan initiated');
    // SDK will open native camera for document capture
  } catch (error) {
    console.error('IDVDocumentProcessStart - Error:', error);
  }
}

// Close button behavior: resetAuthState for pre-login, cancel API for post-login
async handleClose() {
  try {
    if (idvWorkflow === 0 || idvWorkflow === 5) {
      // Pre-login flow: Call resetAuthState
      await rdnaService.resetAuthState();
    } else {
      // Post-login flow (workflow 6): Call cancel API
      console.log('IDVDocumentProcessStart - Post-login flow, calling cancel API');
      await rdnaIDVService.setIDVDocumentScanProcessStartConfirmation(
        false, // isConfirm = false
        idvWorkflow // 6
      );
      // This triggers onActivatedCustomerKYCResponse event with error 240 (User Cancelled)
    }
  } catch (error) {
    console.error('IDVDocumentProcessStart - Close error:', error);
  }
}
Document Details Confirmation
After document capture, SDK triggers getIDVConfirmDocumentDetails event with challenge mode 9:
IDVConfirmDocumentDetailsScreen.js Key Changes
// Event handler receives challenge mode 9
const challengeMode = this.state.challengeMode;
// challengeMode = 9 for post-login KYC

// User confirms document details are correct
async handleConfirmDocument() {
  try {
    console.log('IDVConfirmDocumentDetails - Confirming document with mode:', challengeMode);

    await rdnaIDVService.setIDVConfirmDocumentDetails(
      true, // isConfirm
      challengeMode // 9 for post-login
    );

    console.log('IDVConfirmDocumentDetails - Document confirmed, waiting for selfie event');
  } catch (error) {
    console.error('IDVConfirmDocumentDetails - Error:', error);
  }
}

// Close button: Challenge mode-based navigation
async handleClose() {
  if (!challengeMode && challengeMode !== 0) {
    this.setError('Invalid challenge mode. Unable to close.');
    return;
  }

  this.setProcessing(true);
  this.setError('');

  try {
    if (challengeMode === 8) {
      // Pre-login flow: Call resetAuthState
      console.log('IDVConfirmDocumentDetails - Pre-login flow, calling resetAuthState');
      await rdnaService.resetAuthState();
    } else {
      // Post-login flow (mode 9): Call cancel API
      console.log('IDVConfirmDocumentDetails - Post-login flow, calling cancel API');
      await rdnaIDVService.setIDVConfirmDocumentDetails(
        false, // isConfirm = false
        challengeMode // 9
      );
      // This triggers onActivatedCustomerKYCResponse event
      // Persistent handler navigates back to ActivatedCustomerKYC screen
    }
  } catch (error) {
    console.error('IDVConfirmDocumentDetails - Close error:', error);
    const errorMessage = error.error?.errorString || 'Failed to close screen';
    this.setError(errorMessage);
  } finally {
    this.setProcessing(false);
  }
}
Document Flow Testing
Test the document scan process:
- Start KYC → Click "Start KYC Verification" on ActivatedCustomerKYCScreen
- Document scan start → Navigate to IDVDocumentProcessStartConfirmationScreen
- Verify workflow → Console shows "workflow: 6"
- Start document scan → Native camera opens for document capture
- Capture document → Scan ID or passport
- Document confirmation → Navigate to IDVConfirmDocumentDetailsScreen with OCR data
- Verify challenge mode → Console shows "challengeMode: 9"
- Confirm document → Click confirm to proceed to selfie
Test Close Button:
- Click close button → Cancel API called (mode 9)
- Event triggered →
onActivatedCustomerKYCResponseevent with error 240 - Navigate back → Handler navigates to ActivatedCustomerKYCScreen
- Error alert shown → "KYC initiation failed: User Cancelled (240)"
Overview
The selfie capture process for post-login KYC also uses workflow 6 and challenge mode 9, with different close button navigation patterns.
Selfie Process Start Confirmation
When SDK triggers getIDVSelfieProcessStartConfirmation event:
IDVSelfieProcessStartConfirmationScreen.js Key Changes
// Event handler receives workflow 6
const idvWorkflow = this.state.idvWorkflow;
// idvWorkflow = 6 for post-login KYC

// User confirms to start selfie capture
async handleStartSelfieCapture() {
  try {
    console.log('IDVSelfieProcessStart - Starting selfie capture with workflow:', idvWorkflow);

    await rdnaIDVService.setIDVSelfieProcessStartConfirmation(
      true, // isConfirm
      false, // useDeviceBackCamera (false = front camera for selfies)
      idvWorkflow // 6 for post-login KYC
    );

    console.log('IDVSelfieProcessStart - Selfie capture initiated');
    // SDK will open native camera for selfie with liveness detection
  } catch (error) {
    console.error('IDVSelfieProcessStart - Error:', error);
  }
}

// Close button behavior based on workflow
async handleClose() {
  try {
    if (idvWorkflow === 0 || idvWorkflow === 5) {
      // Pre-login flow: Call resetAuthState
      await rdnaService.resetAuthState();
    } else {
      // Post-login flow (workflow 6): Call cancel API
      console.log('IDVSelfieProcessStart - Post-login flow, calling cancel API');
      await rdnaIDVService.setIDVSelfieProcessStartConfirmation(
        false, // isConfirm = false
        false,
        idvWorkflow // 6
      );
      // This triggers onActivatedCustomerKYCResponse event with error 240
    }
  } catch (error) {
    console.error('IDVSelfieProcessStart - Close error:', error);
  }
}
Selfie Confirmation
After selfie capture, SDK triggers getIDVSelfieConfirmation event with challenge mode 9:
IDVSelfieConfirmationScreen.js Key Changes
// Event handler receives challenge mode 9
const challengeMode = this.state.challengeMode;
// challengeMode = 9 for post-login KYC

// User confirms selfie biometric results
async handleConfirmSelfie() {
  try {
    console.log('IDVSelfieConfirmation - Confirming selfie with mode:', challengeMode);

    await rdnaIDVService.setIDVSelfieConfirmation(
      "true", // action (string value)
      challengeMode // 9 for post-login
    );

    console.log('IDVSelfieConfirmation - Selfie confirmed, waiting for consent event');
  } catch (error) {
    console.error('IDVSelfieConfirmation - Error:', error);
  }
}

// Close button: Challenge mode-based navigation
// Important: No cancel API available for selfie confirmation!
async handleClose() {
  if (!challengeMode && challengeMode !== 0) {
    this.setError('Invalid challenge mode. Unable to close.');
    return;
  }

  this.setProcessing(true);
  this.setError('');

  try {
    if (challengeMode === 8) {
      // Pre-login flow: Call resetAuthState
      console.log('IDVSelfieConfirmation - Pre-login flow, calling resetAuthState');
      await rdnaService.resetAuthState();
      console.log('IDVSelfieConfirmation - ResetAuthState successful');
    } else {
      // Post-login flow (mode 9): Navigate directly to ActivatedCustomerKYC
      // No cancel API available for selfie confirmation
      console.log('IDVSelfieConfirmation - Post-login flow, navigating to ActivatedCustomerKYC');
      NavigationService.navigate('ActivatedCustomerKYC', this.state);
      console.log('IDVSelfieConfirmation - Navigated to ActivatedCustomerKYC, button will be auto-enabled');
    }
  } catch (error) {
    console.error('IDVSelfieConfirmation - Close error:', error);
    const errorMessage = error.error?.errorString || 'Failed to close screen';
    this.setError(errorMessage);
  } finally {
    this.setProcessing(false);
  }
}
Selfie Flow Testing
Test the selfie capture process:
- Document confirmed → After document confirmation, navigate to IDVSelfieProcessStartConfirmationScreen
- Verify workflow → Console shows "workflow: 6"
- Start selfie capture → Native camera opens with liveness detection
- Capture selfie → Follow on-screen instructions for liveness check
- Selfie confirmation → Navigate to IDVSelfieConfirmationScreen with biometric results
- Verify challenge mode → Console shows "challengeMode: 9"
- Review biometric scores → Face match score and liveness score displayed
- Confirm selfie → Click confirm to proceed to biometric consent
Test Close Button:
- Click close button → Direct navigation (mode 9, no cancel API)
- Navigate back → Navigate to ActivatedCustomerKYCScreen directly
- Button re-enabled → Screen lifecycle resets button state
- No alert shown → No event triggered, user can retry from beginning
Overview
The biometric consent for post-login KYC uses challenge mode 9 with a different response structure compared to pre-login flow.
Key Differences in Response Structure
Aspect | Pre-Login (Mode 8) | Post-Login (Mode 9) |
challengeResponse | Present | Optional/Absent |
status location |
| Root level |
status access |
|
|
Biometric Opt-In Consent
When SDK triggers getIDVBiometricOptInConsent event with challenge mode 9:
IDVBiometricOptInConsentScreen.js Key Changes
// Event handler receives challenge mode 9
const challengeMode = this.state.challengeMode;
// challengeMode = 9 for post-login KYC

// User accepts or rejects biometric template storage
async handleConsentAction(isOptIn) {
  if (!challengeMode && challengeMode !== 0) {
    this.setError('Invalid challenge mode. Unable to process consent.');
    return;
  }

  this.setProcessing(true);
  this.setError('');

  try {
    console.log('IDVBiometricOptInConsent - Processing consent with mode:', challengeMode, 'isOptIn:', isOptIn);

    await rdnaIDVService.setIDVBiometricOptInConsent(
      isOptIn, // true = accept, false = reject
      challengeMode // 9 for post-login
    );

    console.log('IDVBiometricOptInConsent - Consent processed successfully');
    // SDK will trigger onActivatedCustomerKYCResponse event with completion status
  } catch (error) {
    console.error('IDVBiometricOptInConsent - Error:', error);
    const errorMessage = error.error?.errorString || 'Failed to process consent';
    this.setError(errorMessage);
  } finally {
    this.setProcessing(false);
  }
}

// Close button: Challenge mode-based navigation
async handleClose() {
  if (this.state.isProcessing) return;

  if (!challengeMode && challengeMode !== 0) {
    this.setError('Invalid challenge mode. Unable to close.');
    return;
  }

  this.setProcessing(true);
  this.setError('');

  try {
    if (challengeMode === 8) {
      // Pre-login flow: Call resetAuthState
      console.log('IDVBiometricOptInConsent - Pre-login flow, calling resetAuthState');
      await rdnaService.resetAuthState();
      console.log('IDVBiometricOptInConsent - ResetAuthState successful');
    } else {
      // Post-login flow (mode 9): Navigate directly to ActivatedCustomerKYC
      console.log('IDVBiometricOptInConsent - Post-login flow, navigating to ActivatedCustomerKYC');
      NavigationService.navigate('ActivatedCustomerKYC', this.state);
      console.log('IDVBiometricOptInConsent - Navigated to ActivatedCustomerKYC, button will be auto-enabled');
    }
  } catch (error) {
    console.error('IDVBiometricOptInConsent - Close error:', error);
    const errorMessage = error.error?.errorString || 'Failed to close screen';
    this.setError(errorMessage);
  } finally {
    this.setProcessing(false);
  }
}
Handling Response Structure Differences
In the IDV event manager, use optional chaining to handle both structures:
rdnaIDVEventManager.js
onGetBiometricOptInConsent(event) {
  console.log('RdnaIDVEventManager - Get biometric opt-in consent event received');

  try {
    const response = event.response || event.detail || event;
    const data = typeof response === 'string' ? JSON.parse(response) : response;

    // Log both potential status locations
    console.log('RdnaIDVEventManager - Status Code (root):', data.status?.statusCode);
    console.log('RdnaIDVEventManager - Status Code (challengeResponse):', data.challengeResponse?.status?.statusCode);

    if (this.getBiometricOptInConsentHandler) {
      this.getBiometricOptInConsentHandler(data);
    }
  } catch (error) {
    console.error('RdnaIDVEventManager - Failed to parse biometric opt-in consent:', error);
  }
}
Biometric Consent Flow Testing
Test the biometric consent process:
- Selfie confirmed → After selfie confirmation, navigate to IDVBiometricOptInConsentScreen
- Verify challenge mode → Console shows "challengeMode: 9"
- Review consent information → Screen displays biometric storage consent details
- Accept consent → Click "Approve" to consent to biometric template storage
- Verify completion → onActivatedCustomerKYCResponse event triggered
- Navigate back → Handler navigates to ActivatedCustomerKYCScreen
- Success alert shown → "The KYC process has been completed successfully"
- Navigate to Dashboard → Click OK to return to Dashboard
Test Reject Consent:
- Reject consent → Click "Reject" to decline biometric template storage
- Verify completion → onActivatedCustomerKYCResponse event triggered (still success)
- Navigate back → Handler navigates to ActivatedCustomerKYCScreen
- Success alert shown → KYC completes without biometric storage
Test Close Button:
- Click close button → Direct navigation (mode 9, no cancel API)
- Navigate back → Navigate to ActivatedCustomerKYCScreen directly
- Button re-enabled → Screen lifecycle resets button state
- No alert shown → No event triggered, user can retry from beginning
Overview
The complete post-login KYC flow integrates all components: drawer menu, KYC screen, document scan, selfie capture, and biometric consent.
Integration Checklist
Verify all components are properly integrated:
1. Service Layer
- ✅
rdnaIDVService.initiateActivatedCustomerKYC()implemented - ✅ Workflow 6 (RDNA_IDV_POSTLOGIN_KYC) used
- ✅ Promise-based API pattern
2. Event Management
- ✅
rdnaIDVEventManager.onActivatedCustomerKYCResponse()implemented - ✅ Event listener registered with
document.addEventListener() - ✅ Handler setter:
setActivatedCustomerKYCResponseHandler() - ✅ Cleanup method:
cleanup()removes listener
3. Navigation
- ✅ Drawer menu has "🆔 Activated Customer KYC" item
- ✅ NavigationService supports KYC screen route
- ✅ Template added to index.html:
ActivatedCustomerKYC-template - ✅ Screen script loaded:
ActivatedCustomerKYCScreen.js
4. Screen Implementation
- ✅ ActivatedCustomerKYCScreen with persistent event handler
- ✅
onContentLoaded()lifecycle method - ✅
setupEventListeners()registers DOM and SDK handlers - ✅
handleStartKYC()initiates KYC workflow - ✅
handleActivatedCustomerKYCResponse()processes event - ✅
displayKYCResult()shows success/error alerts - ✅ Dual validation pattern (error code + status code)
5. IDV Screens
- ✅ Document scan screens support workflow 6, mode 9
- ✅ Selfie capture screens support workflow 6, mode 9
- ✅ Biometric consent screen supports mode 9
- ✅ Close button behaviors adapted for post-login flow
- ✅ Challenge mode-based navigation patterns
End-to-End Flow Testing
Test the complete KYC flow from start to finish:
Success Path:
- Login → Activate and login with credentials
- Dashboard → Navigate to Dashboard after login
- Open Drawer → Tap menu button (☰) or swipe from left
- Navigate to KYC → Tap "🆔 Activated Customer KYC"
- View KYC Info → Read requirements and process steps
- Start KYC → Click "Start KYC Verification"
- Document Scan Start → View guidelines, click "Scan Document"
- Capture Document → Scan ID or passport using native camera
- Confirm Document → Review OCR data, click "Confirm"
- Selfie Start → View guidelines, click "Capture Selfie"
- Capture Selfie → Follow liveness detection instructions
- Confirm Selfie → Review biometric scores, click confirm
- Biometric Consent → Read consent, click "Approve"
- Wait for Event → onActivatedCustomerKYCResponse triggered
- Navigate Back → Automatic navigation to ActivatedCustomerKYC
- Success Alert → "The KYC process has been completed successfully"
- Go to Dashboard → Click OK, navigate to Dashboard
Cancellation Path:
- Start KYC Again → From Dashboard drawer, navigate to KYC
- Start Process → Click "Start KYC Verification"
- Document Scan Start → View guidelines
- Cancel → Click close button (✕)
- Wait for Event → onActivatedCustomerKYCResponse with error 240
- Navigate Back → Automatic navigation to ActivatedCustomerKYC
- Error Alert → "KYC initiation failed: User Cancelled (240)"
- Verify Retry → Button re-enabled, can start again
Overview
Comprehensive testing ensures the post-login KYC flow works correctly across all scenarios.
Testing Setup
Prerequisites:
- Activated customer credentials (username + password)
- Valid REL-ID SDK license
- Document scanning license (Regula)
- Test ID documents (passport, driver's license, national ID)
- Mobile device with front camera (for selfies)
Test Environment:
# Build and run on iOS
cordova build ios
cordova run ios --device

# Build and run on Android
cordova build android
cordova run android --device
Test Scenarios
Scenario 1: Complete Success Flow
Objective: Verify end-to-end KYC completion with all steps succeeding.
Steps:
- Login with activated credentials
- Navigate to Dashboard
- Open drawer, tap "🆔 Activated Customer KYC"
- Click "Start KYC Verification"
- Complete document scan with valid ID
- Confirm document details
- Complete selfie capture with liveness detection
- Confirm selfie biometric results
- Approve biometric consent
Expected Result:
- onActivatedCustomerKYCResponse event triggered
- error.longErrorCode = 0
- status.statusCode = 100 or 0
- Success alert: "The KYC process has been completed successfully"
- Navigate to Dashboard after clicking OK
Console Verification:
RdnaIDVService - Activated customer KYC initiated successfully
RdnaIDVService - Workflow: 6 (RDNA_IDV_POSTLOGIN_KYC)
RdnaIDVService - Challenge Mode: 9 (post-login)
...
RdnaIDVEventManager - Activated customer KYC response event received
RdnaIDVEventManager - Error Code: 0
RdnaIDVEventManager - Status Code: 100
ActivatedCustomerKYCScreen - The KYC process has been completed successfully
Scenario 2: User Cancellation During Document Scan
Objective: Verify proper handling when user cancels during document scan.
Steps:
- Start KYC verification
- Navigate to document scan start screen
- Click close button (✕)
Expected Result:
- Cancel API called:
setIDVDocumentScanProcessStartConfirmation(false, 6) - onActivatedCustomerKYCResponse event triggered
- error.longErrorCode = 240 (User Cancelled)
- Error alert: "KYC initiation failed: User Cancelled (240)"
- Navigate to Dashboard after clicking OK
- Button re-enabled for retry
Console Verification:
IDVDocumentProcessStart - Post-login flow, calling cancel API
RdnaIDVEventManager - Error Code: 240
ActivatedCustomerKYCScreen - Sync error detected: 240
Scenario 3: User Cancellation During Selfie Confirmation
Objective: Verify proper handling when user closes selfie confirmation.
Steps:
- Complete document scan
- Complete selfie capture
- On selfie confirmation screen, click close button (✕)
Expected Result:
- Direct navigation to ActivatedCustomerKYC (no cancel API for selfie)
- No onActivatedCustomerKYCResponse event triggered
- No alert shown
- Button re-enabled automatically
- User can retry KYC from beginning
Console Verification:
IDVSelfieConfirmation - Post-login flow, navigating to ActivatedCustomerKYC
ActivatedCustomerKYCScreen - Content loaded with params
Scenario 4: Biometric Consent Rejection
Objective: Verify KYC completes successfully even when user rejects biometric consent.
Steps:
- Complete document scan
- Complete selfie capture
- Confirm selfie results
- On biometric consent screen, click "Reject"
Expected Result:
setIDVBiometricOptInConsent(false, 9)called- onActivatedCustomerKYCResponse event triggered
- error.longErrorCode = 0
- status.statusCode = 100 or 0
- Success alert shown
- KYC completes without biometric template storage
Console Verification:
IDVBiometricOptInConsent - Processing consent with mode: 9 isOptIn: false
IDVBiometricOptInConsent - Consent processed successfully
ActivatedCustomerKYCScreen - The KYC process has been completed successfully
Validation Checks
For each test scenario, verify:
1. Event Handler Persistence
- ✅ Handler registered once in
setupEventListeners() - ✅ Handler remains active when navigating to IDV screens
- ✅ Handler receives
onActivatedCustomerKYCResponseevent - ✅ Handler navigates back to ActivatedCustomerKYC screen
2. Dual Validation
- ✅ Check
error.longErrorCodefirst (0 = success, 240 = cancelled, others = error) - ✅ Check
status.statusCodesecond (100 or 0 = success, others = backend error) - ✅ Show appropriate alert based on validation result
3. Navigation
- ✅ Drawer menu opens correctly from all screens
- ✅ KYC screen navigates to IDV screens with correct params
- ✅ IDV screens navigate back to KYC screen after event
- ✅ Dashboard navigation works after KYC completion
4. UI State
- ✅ Button disabled during processing
- ✅ Button re-enabled after completion or error
- ✅ Status banner shown for sync errors
- ✅ Alert shown for async event results
Common Issues & Solutions
Issue 1: Event Handler Not Receiving Event
Symptoms: KYC completes but screen doesn't navigate back, no alert shown.
Solution:
- Verify handler registered: Check console for "Event handler registered"
- Verify event listener registered: Check
rdnaIDVEventManager.registerEventListeners() - Verify handler not cleared: Don't use
useFocusEffectfor handler registration - Check event name: Must be exactly
onActivatedCustomerKYCResponse
Issue 2: Navigation Fails After KYC
Symptoms: Alert shown but navigation to Dashboard fails.
Solution:
- Verify NavigationService route exists:
navigate('Dashboard', params) - Check params passed: Must include
userIDandsessionID - Verify screen template exists:
Dashboard-templatein index.html - Check screen script loaded:
DashboardScreen.jsin index.html
Issue 3: Close Button Doesn't Work
Symptoms: Clicking close button does nothing or shows error.
Solution:
- Verify challenge mode passed: Check params in
onContentLoaded() - For mode 9 + document confirm: Call cancel API
- For mode 9 + selfie confirm: Direct navigation (no cancel API)
- For mode 9 + biometric consent: Direct navigation (no cancel API)
- Check error handling: Log errors in catch blocks
What You've Accomplished
Congratulations! You've successfully implemented a complete post-login KYC (Know Your Customer) identity verification flow for activated customers using REL-ID SDK in Cordova.
Key Learnings
Throughout this codelab, you've learned:
✅ Post-Login KYC Architecture
- Workflow 6 (RDNA_IDV_POSTLOGIN_KYC) for activated customers
- Challenge mode 9 for post-login scenarios
- Differences from pre-login IDV flows
✅ Service Layer Implementation
initiateActivatedCustomerKYC()API with promise pattern- Workflow 6 and challenge mode 9 handling
- Global SDK object usage in Cordova
✅ Event Management
onActivatedCustomerKYCResponseevent handling- Persistent event handler pattern across screens
- Document event listeners in Cordova
- Proper cleanup to prevent memory leaks
✅ Navigation Integration
- Drawer menu integration for KYC access
- SPA template-based content swapping
- NavigationService route management
- Parameter passing between screens
✅ Screen Implementation
- ActivatedCustomerKYCScreen as KYC entry point
- Persistent event handler registration
- Dual validation pattern (sync error + backend status)
- Success/error alert dialogs
- SPA lifecycle with
onContentLoaded()
✅ IDV Flow Adaptation
- Document scan with workflow 6, mode 9
- Selfie capture with workflow 6, mode 9
- Biometric consent with mode 9 response structure
- Challenge mode-based close button behaviors
- Cancel APIs vs direct navigation
Code Architecture
The implementation follows clean separation of concerns:
┌─────────────────────────────────────────────┐
│           Drawer Menu (index.html)          │
│         🆔 Activated Customer KYC          │
└──────────────────┬──────────────────────────┘
                   │
                   ↓
┌─────────────────────────────────────────────┐
│    ActivatedCustomerKYCScreen.js (SPA)     │
│  - Persistent event handler registration    │
│  - initiateActivatedCustomerKYC() call     │
│  - Dual validation pattern                  │
│  - Success/error alert display              │
└──────────────────┬──────────────────────────┘
                   │
                   ↓
┌─────────────────────────────────────────────┐
│       rdnaIDVService.js (Service)          │
│  - initiateActivatedCustomerKYC(reason)    │
│  - Workflow 6, Mode 9 handling              │
│  - Promise-based API wrapper                │
└──────────────────┬──────────────────────────┘
                   │
                   ↓
┌─────────────────────────────────────────────┐
│    rdnaIDVEventManager.js (Events)         │
│  - onActivatedCustomerKYCResponse handler  │
│  - Event listener registration              │
│  - Handler invocation and cleanup           │
└──────────────────┬──────────────────────────┘
                   │
                   ↓
┌─────────────────────────────────────────────┐
│         IDV Workflow (SDK Driven)          │
│  Document Scan → Selfie → Biometric        │
│  (Workflow 6, Challenge Mode 9)            │
└─────────────────────────────────────────────┘
Best Practices Applied
This implementation demonstrates several important patterns:
- Persistent Event Handlers: Handlers registered once and stay active across navigation
- Dual Validation: Two-tier error checking (SDK sync + backend status)
- SPA Lifecycle: Screen modules with
onContentLoaded()for initialization - Global SDK Objects: Cordova plugin access via
com.uniken.rdnaplugin.RdnaClient - Promise Patterns: Async/await for clean asynchronous code
- Challenge Mode Handling: Different close button behaviors based on mode
- Navigation Patterns: Template-based content swapping without page reloads
Resources
Thank you for completing the REL-ID IDV Post-Login KYC Flow codelab! You now have the skills to implement secure, compliant identity verification for your Cordova applications.
Happy Coding! 🎉