🎯 Learning Path:
- Complete REL-ID Initialization Flow Codelab
- Complete REL-ID Complete IDV MFA Activation & Login Flow Codelab
- Optional: Complete other IDV flows if you need to create a biometric template first
- You are here → Post-Login Server Biometric Authentication Implementation
Welcome to the REL-ID IDV Post-Login Server Biometric Authentication Flow codelab! This tutorial teaches you how to implement secure server-side biometric verification using stored biometric templates with liveness detection for activated customers.
What You'll Build
In this codelab, you'll implement a complete post-login server biometric authentication workflow:
- 🔍 Template Status Check: Verify biometric template availability on server
- 🆕 Server Biometric Authentication Screen: Entry point for authentication initiation
- 📸 Selfie Capture Process: Live selfie capture with liveness detection (reused from IDV MFA flow)
- ✅ Authentication Result Display: Comprehensive audit data with success/failure status
- 🔄 View Lifecycle Pattern: Event handlers registered in viewDidLoad and viewWillAppear
- 🔔 Navigate-Back-Before-Alert Pattern: Proper navigation maintaining view controller context
- 🔐 Status Code Validation: Template existence verification (100=exists, 600=no template)
Key Difference: Server Biometric Auth vs KYC Flow
This codelab demonstrates post-login server biometric authentication, which is different from KYC:
KYC Flow (Workflow 6, Challenge Mode 9):
Document Scan → Selfie Capture → Biometric Consent → Complete KYC
(Creates new biometric template)

Server Biometric Auth Flow (Workflow 8, Challenge Mode 25 - This Codelab):
Template Check → Start Authentication → Selfie Capture → View Result
(Uses existing biometric template for verification)
Critical Differences:
- Workflow: 8 (selfie capture) instead of 6 (complete KYC)
- Challenge Mode: 25 (server biometric auth result) instead of 9 (KYC)
- Template Requirement: Requires pre-existing template (status check first)
- Flow Simplicity: Selfie capture only (no document scanning or consent)
- Entry Point: ServerBiometricAuthenticationViewController instead of KYC screen
- Result Callback:
onIDVServerBiometricAuthenticationResultinstead ofonActivatedCustomerKYCResponse - Status Codes: 100=template exists, 600=no template (validation before authentication)
What You'll Learn
- ✅ How to check biometric template status before authentication
- ✅ Using workflow 8 (selfie capture) and challenge mode 25 (server biometric auth)
- ✅ Implementing template status validation with status codes 100/600
- ✅ Handling server biometric authentication result callbacks with audit data
- ✅ Managing menu navigation for biometric authentication access
- ✅ Implementing view lifecycle pattern for persistent event handlers
- ✅ Using navigate-back-before-alert pattern for result display
- ✅ Parsing authentication audit info (status, use case, transaction ID, attempts)
- ✅ Handling error 240 (user cancellation) gracefully
Prerequisites
- Completion of REL-ID Initialization codelab
- Completion of REL-ID IDV MFA Activation & Login codelab
- Biometric template on server (from KYC flow or other biometric opt-in process)
- Basic understanding of iOS development and Swift
- REL-ID SDK integration credentials
- Understanding of liveness detection concepts
Technology Stack
- iOS: 13.0+
- Swift: 5.5+
- REL-ID SDK: RELID Framework (Latest)
- Aware FaceCapture: For selfie capture and liveness detection
- Navigation: UIKit UINavigationController with Menu
Post-Login Server Biometric Authentication Flow Diagram
Understanding the complete flow is crucial before implementation:
1. User Login (Activated Customer with Biometric Template)
   ↓ (Existing credentials authenticated)

2. Dashboard → Open Menu
   ↓ (User navigates to Biometric Authentication option)

3. 🆕 Server Biometric Authentication Screen
   ├─ viewDidLoad() triggers
   ├─ Automatic template status check
   ├─ checkIDVUserBiometricTemplateStatus() API called
   └─ Wait for onIDVCheckUserBiometricTemplateStatus callback
   ↓

4. Template Status Validation
   ├─ onIDVCheckUserBiometricTemplateStatus callback received
   ├─ View controller handler processes callback
   ├─ Parse status code:
   │  ├─ statusCode === 100: Template exists → Enable button
   │  └─ statusCode === 600: No template → Disable button, show message
   └─ Display template status on screen
   ↓

5. Start Authentication (only if template exists)
   ├─ User taps "Start Authentication" button
   ├─ initiateIDVServerBiometricAuthentication("Server Biometric Authentication") API called
   └─ SDK initiates server biometric authentication workflow
   ↓

6. 📸 Selfie Capture Process (Reused from IDV MFA Flow)
   ├─ getIDVSelfieProcessStartConfirmation callback
   │  • idvWorkFlow: 8 (selfie capture)
   ├─ Navigate to IDVSelfieProcessStartConfirmationViewController
   ├─ User taps "Start Selfie Capture" OR Close button (X)
   │  ├─ "Start Selfie Capture": setIDVSelfieProcessStartConfirmation(true, 8) → Opens camera
   │  └─ Close button: setIDVSelfieProcessStartConfirmation(false, 8) → Triggers result with error 240
   └─ Native Selfie Capture (Aware FaceCapture) with liveness detection
   ↓

7. ✅ Server Biometric Authentication Result
   ├─ onIDVServerBiometricAuthenticationResult callback triggered
   │  • challengeMode: 25 (server biometric authentication)
   ├─ View controller handler receives callback (even if on different screen)
   ├─ Pop back to ServerBiometricAuthentication view controller
   │  • navigationController?.popToViewController(self, animated: true)
   ├─ Wait 500ms for navigation to complete
   ├─ Parse idvResponse for audit data:
   │  ├─ Authentication Status (MATCHED/NOT_MATCHED from biometric_result.display_text)
   │  ├─ Orchestration Use Case (RDNA_IDV_POSTLOGIN_IDV_SELFIE_BIOMETRIC)
   │  ├─ Transaction ID (idv_audit_transaction_id)
   │  └─ Attempts Left (attempts_left)
   ├─ Display result alert with audit data
   └─ User taps "Back to Dashboard" or "OK"
   ↓

8. Completion
   ├─ Navigate to Dashboard or stay on screen
   └─ User can perform another authentication (template check happens on viewWillAppear)
UI Preview: Menu
The biometric authentication flow is accessed from the menu:
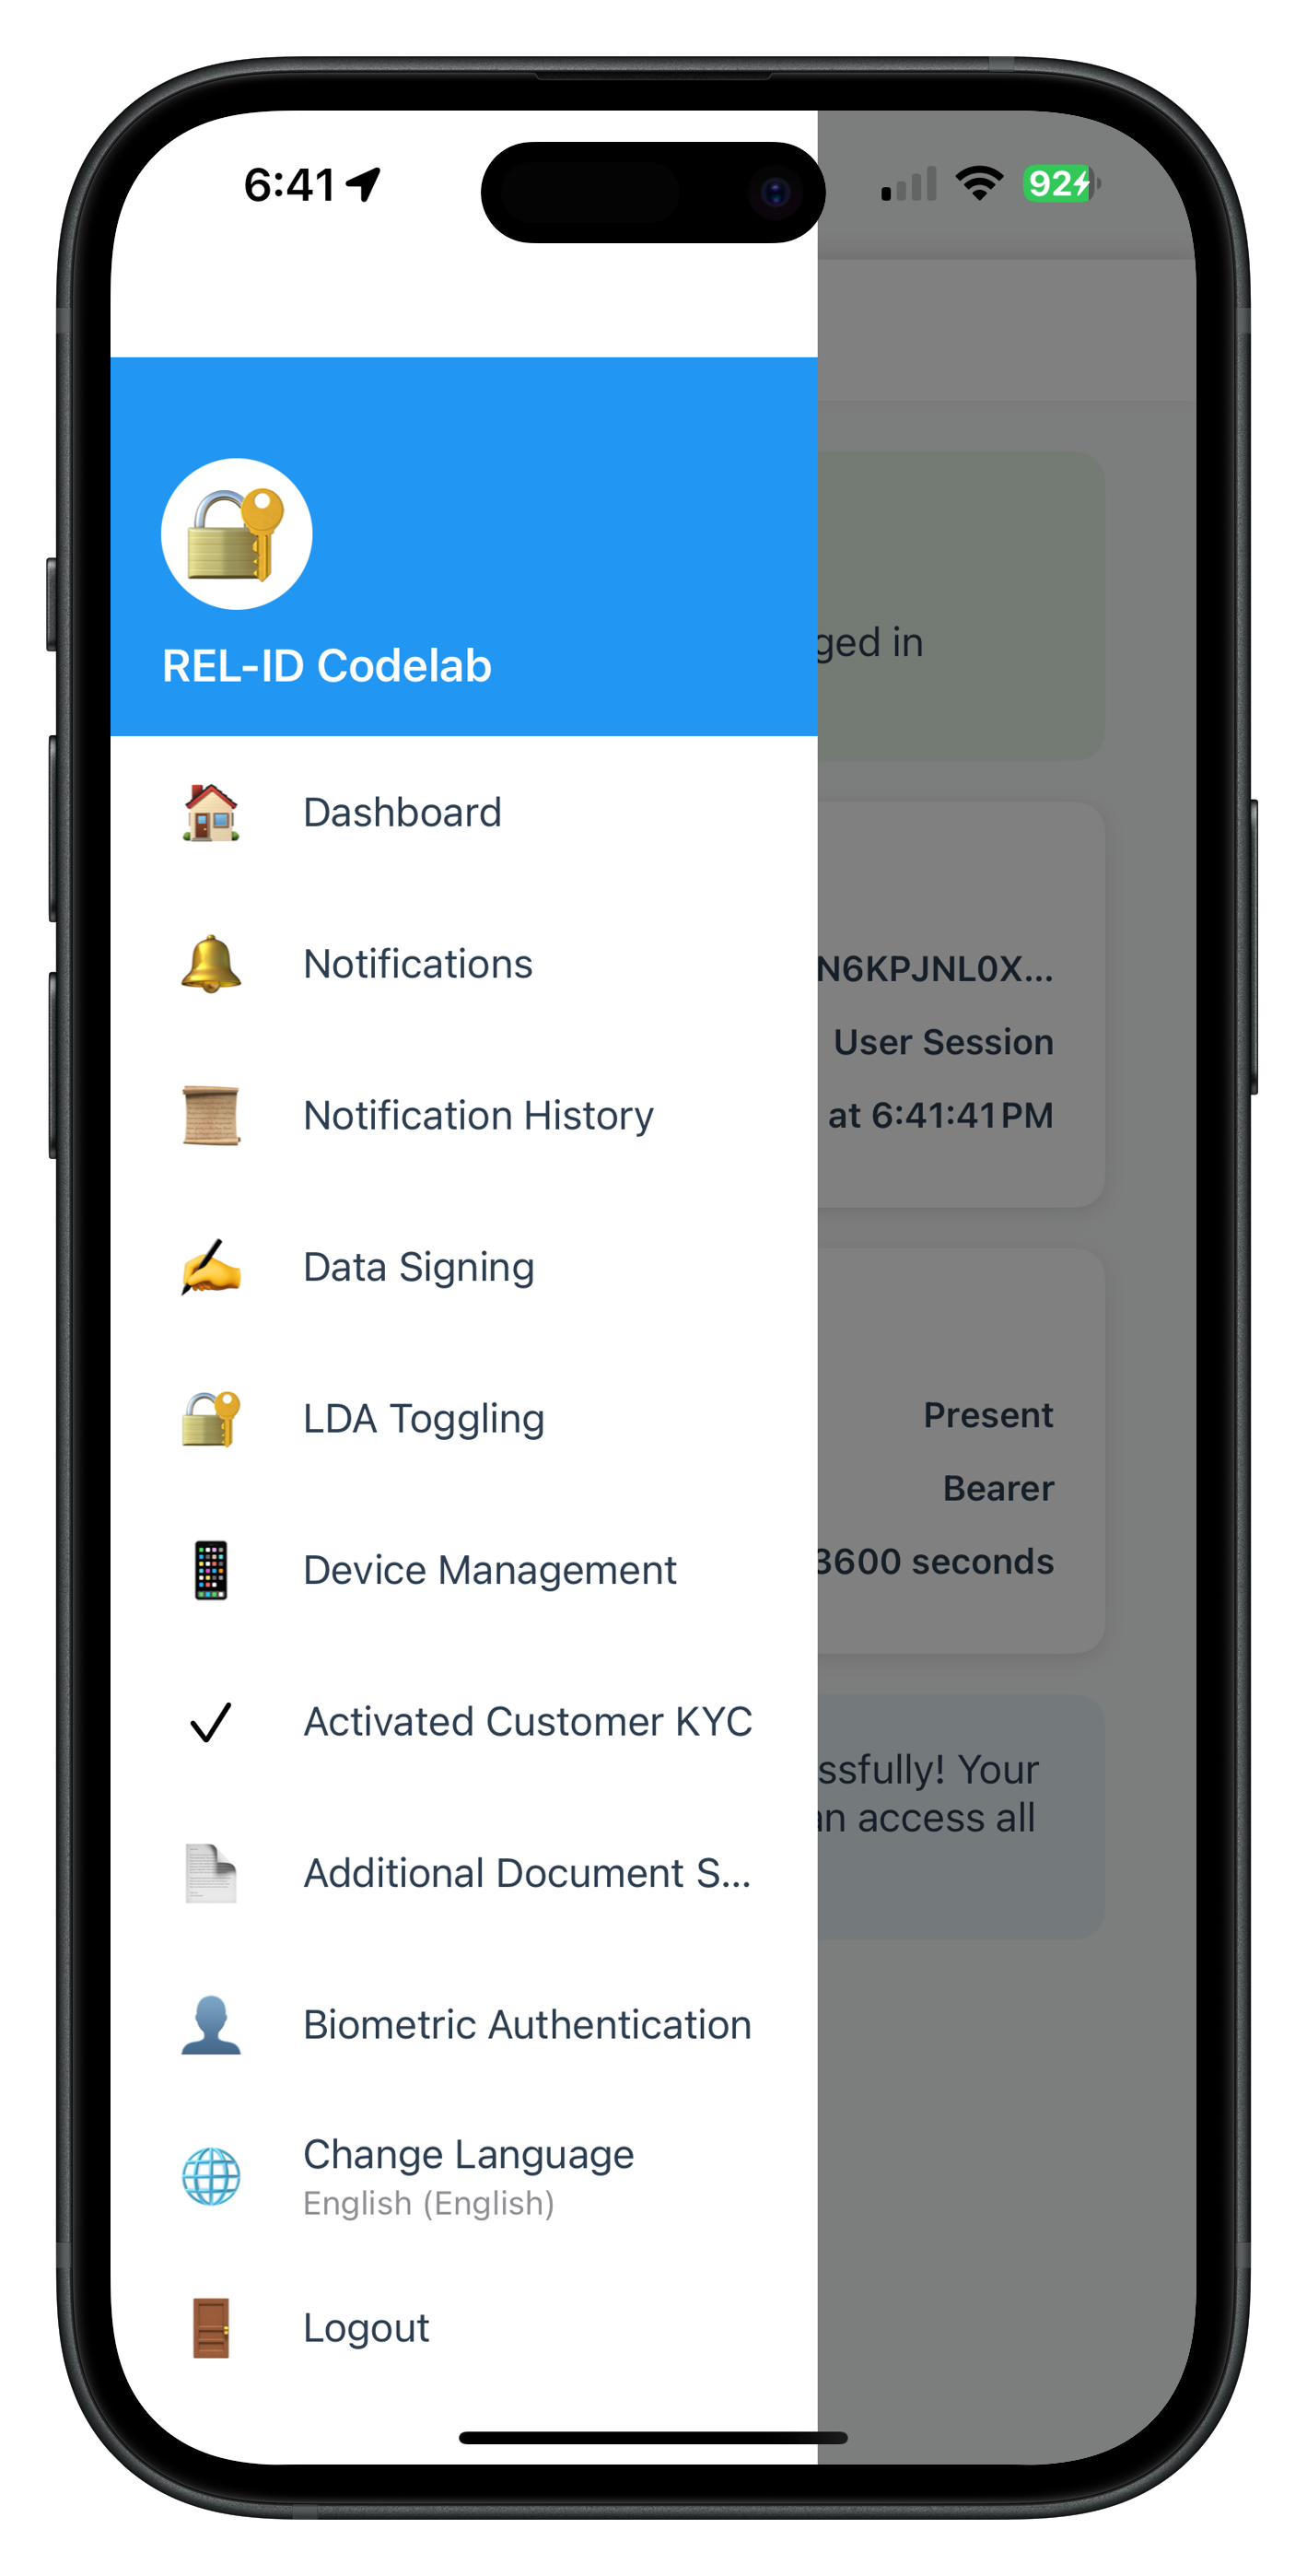
The menu includes a "🔐 Biometric Authentication" menu item that navigates to the ServerBiometricAuthenticationViewController.
IDV Workflow and Challenge Mode Values
For post-login server biometric authentication, you'll use these specific values:
Parameter | Value | Description |
idvWorkflow |
| Selfie capture for server biometric authentication |
challengeMode |
| Server biometric authentication result callback |
Status Codes |
| Template exists / No template |
Comparison with Other IDV Flows:
Aspect | KYC Flow | Additional Document Scan | Server Biometric Auth |
Workflow | 6 | 7 | 8 |
Challenge Mode | 9 | 10 | 25 |
Template Check | No | No | Yes (required) |
Document Scan | Yes | Yes | No |
Selfie Capture | Yes | No | Yes |
Biometric Consent | Yes | No | No |
Template Creation | Yes (new) | No | No (uses existing) |
Entry Point | ActivatedCustomerKYCViewController | AdditionalDocumentScanViewController | ServerBiometricAuthenticationViewController |
API | initiateActivatedCustomerKYC | initiateIDVAdditionalDocumentScan | initiateIDVServerBiometricAuthentication and checkIDVUserBiometricTemplateStatus |
Result Callback | onActivatedCustomerKYCResponse | onIDVAdditionalDocumentScanResult | onIDVServerBiometricAuthenticationResult |
Before You Begin
Ensure you have completed these requirements:
1. Previous Codelabs Completed
- ✅ REL-ID Initialization Flow
- ✅ REL-ID MFA Activation & Login Flow
- ✅ Biometric Template: User must have biometric template on server (from KYC or other IDV flow)
2. Development Environment
# Required tools
Xcode >= 13.0
CocoaPods or Swift Package Manager
iOS Deployment Target >= 13.0
3. REL-ID SDK Credentials
- Connection profile configuration
- Valid REL-ID SDK license
- No document scanning license needed (selfie only)
Get the Code from GitHub
The code to get started can be found in a GitHub repository.
You can clone the repository using the following command:
git clone https://github.com/uniken-team/relid-codelab-ios.git
Navigate to the relid-IDV-post-login-server-biometric-authentication folder:
cd relid-codelab-ios/relid-IDV-post-login-server-biometric-authentication
Project Structure
The post-login server biometric authentication codelab follows this structure:
relidcodelab/
├── AppDelegate.swift              # App lifecycle
├── SceneDelegate.swift            # Scene lifecycle (iOS 13+)
├── Sources/
│   ├── Tutorial/
│   │   ├── Screens/
│   │   │   ├── IDV/                                        # IDV Screens
│   │   │   │   ├── ServerBiometricAuthenticationViewController.swift  # 🆕 Auth Entry Point
│   │   │   │   ├── IDVSelfieProcessStartConfirmationViewController.swift  # ♻️ Reused
│   │   │   │   └── ...
│   │   │   ├── MFA/                                        # MFA Screens
│   │   │   │   ├── DashboardViewController.swift
│   │   │   │   └── ...
│   │   │   └── MenuViewController.swift                    # 🆕 Menu with Auth item
│   │   └── Navigation/
│   │       └── AppIDVCoordinator.swift                     # 🆕 Auth navigation
│   └── Uniken/
│       ├── Services/
│       │   ├── IDV/
│       │   │   ├── RDNAIDVService.swift                    # 🆕 Template check + auth APIs
│       │   │   │                                          # - checkIDVUserBiometricTemplateStatus()
│       │   │   │                                          # - initiateIDVServerBiometricAuthentication()
│       │   │   └── RDNAIDVDelegateManager.swift            # 🆕 Callback handlers
│       │   │                                              # - onIDVCheckUserBiometricTemplateStatus
│       │   │                                              # - onIDVServerBiometricAuthenticationResult
│       │   └── RDNADelegateManager.swift
│       ├── Utils/
│       │   └── ConnectionProfileParser.swift               # Bundle resource loading
│       └── CP/
│           └── agent_info.json                            # Connection profile
├── Base.lproj/
│   └── Main.storyboard                                    # UI layout
├── Info.plist                                             # App configuration
├── Podfile                                                # CocoaPods dependencies
└── RELID_IDV/                                             # Local pod (SDK)
IDV Assets Configuration
The project includes pre-configured Aware FaceCapture library for biometric authentication:
Required Libs:
- Aware FaceCapture Library - Embedded in RELID IDV local pod
NOT Required:
- ❌ Regula Document Reader - Not needed (no document scanning)
- ❌ db.dat - Not needed (no document verification)
- ❌ Document scanning license - Not needed
Overview
Before implementing the authentication screen, you need to add two API methods to the IDV service layer:
checkIDVUserBiometricTemplateStatus()- Check if user has biometric template on serverinitiateIDVServerBiometricAuthentication(reason:)- Start authentication workflow
Implement Template Status Check API
Add the following method to RDNAIDVService.swift:
// Sources/Uniken/Services/IDV/RDNAIDVService.swift

import Foundation
import RELID

class RDNAIDVService {
    // MARK: - Singleton
    static let shared = RDNAIDVService()
    private let rdna = RDNA.sharedInstance()

    private init() {
        print("RDNAIDVService - Service initialized")
    }

    // MARK: - Server Biometric Authentication APIs

    /**
     * Check IDV User Biometric Template Status
     *
     * Checks if the user has a biometric template stored on the server.
     * This should be called before allowing server biometric authentication.
     *
     * @returns RDNAError indicating success or failure
     *
     * Flow:
     * 1. SDK checks template availability on server
     * 2. SDK triggers onIDVCheckUserBiometricTemplateStatus callback with status code:
     *    - 100 = Template present (user can authenticate)
     *    - 600 = Template does not exist (user must complete biometric opt-in first)
     *    - 400/500 = Error
     *
     * Success Response:
     * - error.longErrorCode = 0
     * - Wait for onIDVCheckUserBiometricTemplateStatus callback
     *
     * Error Responses:
     * - Sync error: error.longErrorCode !== 0
     */
    func checkIDVUserBiometricTemplateStatus() -> RDNAError {
        print("RDNAIDVService - Checking user biometric template status")

        let error = rdna.checkIDVUserBiometricTemplateStatus()

        if error.longErrorCode == 0 {
            print("RDNAIDVService - CheckIDVUserBiometricTemplateStatus request successful")
            print("  Awaiting onIDVCheckUserBiometricTemplateStatus callback")
        } else {
            print("RDNAIDVService - CheckIDVUserBiometricTemplateStatus failed:")
            print("  Error: \(error.errorString)")
            print("  Code: \(error.longErrorCode)")
        }

        return error
    }

    // ... continue with authentication initiation API
}
Implement Server Biometric Authentication Initiation API
Add the following method to RDNAIDVService.swift:
    /**
     * Initiate IDV Server Biometric Authentication
     *
     * Initiates post-login server biometric authentication workflow for already activated
     * customers with stored biometric templates.
     *
     * @param reason - Reason for authentication (e.g., "Server Biometric Authentication")
     * @returns RDNAError indicating success or failure
     *
     * Flow:
     * 1. SDK initiates server biometric authentication workflow
     *    - workflow: 8 (selfie capture)
     *    - challengeMode: 25 (server biometric auth result)
     * 2. SDK automatically triggers:
     *    - getIDVSelfieProcessStartConfirmation callback (idvWorkFlow: 8)
     * 3. After selfie capture, SDK triggers:
     *    - onIDVServerBiometricAuthenticationResult callback (challengeMode: 25)
     *
     * Success Response:
     * - error.longErrorCode = 0
     *
     * Error Responses:
     * - Sync error: error.longErrorCode !== 0
     * - Backend error: Received in onIDVServerBiometricAuthenticationResult callback
     */
    func initiateIDVServerBiometricAuthentication(reason: String) -> RDNAError {
        print("RDNAIDVService - Initiating IDV server biometric authentication")
        print("  Reason: \(reason)")

        let error = rdna.initiateIDVServerBiometricAuthentication(reason)

        if error.longErrorCode == 0 {
            print("RDNAIDVService - InitiateIDVServerBiometricAuthentication request successful")
            print("  Awaiting onIDVServerBiometricAuthenticationResult callback")
        } else {
            print("RDNAIDVService - InitiateIDVServerBiometricAuthentication failed:")
            print("  Error: \(error.errorString)")
            print("  Code: \(error.longErrorCode)")
        }

        return error
    }
}
Key Points
- Template Check First: Always check template status before allowing authentication
- Workflow 8: Authentication uses selfie capture workflow
- Challenge Mode 25: Result callback uses server biometric auth challenge mode
- Sync Return: Immediate response confirming API call accepted
- Async Callback: Actual results come via delegate callbacks
- Error Handling: Check error.longErrorCode (0 = success)
Overview
Implement callback handlers for template status check and authentication result in the IDV Delegate Manager using closures.
Add Callback Closure Properties
Add the following to RDNAIDVDelegateManager.swift:
// Sources/Uniken/Services/IDV/RDNAIDVDelegateManager.swift

import Foundation
import RELID

/// Manages IDV-specific delegate callbacks from the RELID SDK
class RDNAIDVDelegateManager: NSObject {

    // MARK: - Singleton
    static let shared = RDNAIDVDelegateManager()

    private override init() {
        super.init()
    }

    // MARK: - Server Biometric Authentication Callback Closures

    /// Closure invoked when biometric template status check completes
    var onIDVCheckUserBiometricTemplateStatus: ((_ userID: String, _ idvResponse: String, _ status: RDNARequestStatus, _ error: RDNAError) -> Void)?

    /// Closure invoked when server biometric authentication completes
    var onIDVServerBiometricAuthenticationResult: ((_ userID: String, _ idvResponse: String, _ status: RDNARequestStatus, _ error: RDNAError) -> Void)?

    // ... existing closures
}
Extend Protocol Conformance
Extend RDNAIDVDelegateManager to conform to RDNAIDVBiometricManagementCallbacks:
// MARK: - RDNAIDVBiometricManagementCallbacks Protocol

extension RDNAIDVDelegateManager: RDNAIDVBiometricManagementCallbacks {

    /**
     * Template Status Check Callback
     * Triggered after checkIDVUserBiometricTemplateStatus API call
     */
    func onIDVCheckUserBiometricTemplateStatus(
        _ userID: String,
        idvResponse: String,
        status: RDNARequestStatus,
        error: RDNAError
    ) {
        print("RDNAIDVDelegateManager - onIDVCheckUserBiometricTemplateStatus called")
        print("  User ID: \(userID)")
        print("  Status Code: \(status.statusCode)")
        print("  Error Code: \(error.longErrorCode)")

        DispatchQueue.main.async { [weak self] in
            self?.onIDVCheckUserBiometricTemplateStatus?(userID, idvResponse, status, error)
        }
    }

    /**
     * Server Biometric Authentication Result Callback
     * Triggered after selfie capture completes during server biometric authentication
     * Challenge Mode: 25
     */
    func onIDVServerBiometricAuthenticationResult(
        _ userID: String,
        idvResponse: String,
        status: RDNARequestStatus,
        error: RDNAError
    ) {
        print("RDNAIDVDelegateManager - onIDVServerBiometricAuthenticationResult called")
        print("  User ID: \(userID)")
        print("  Status Code: \(status.statusCode)")
        print("  Error Code: \(error.longErrorCode)")

        DispatchQueue.main.async { [weak self] in
            self?.onIDVServerBiometricAuthenticationResult?(userID, idvResponse, status, error)
        }
    }
}
Register Delegate with SDK
Ensure the delegate is registered in your initialization flow (in onInitialized callback):
// In your initialization completion handler
func onInitialized(_ response: RDNAChallengeResponse) {
    // Register IDV delegates
    let error = RDNAIDVService.shared.setIDVCallback()

    if error.longErrorCode == 0 {
        // Register specific delegates
        RDNAIDVService.shared.setIDVBiometricManagementDelegate(RDNAIDVDelegateManager.shared)
        print("IDV Biometric Management delegate registered")
    }
}
Key Points
- Closure Pattern: View controllers register closures to receive callbacks
- Main Thread Dispatch: All callbacks dispatched to main thread for UI updates
- Weak Self: Use
[weak self]to avoid retain cycles - Logging: Comprehensive logging for debugging
- Protocol Conformance: Conforms to
RDNAIDVBiometricManagementCallbacks
Overview
The iOS SDK provides callback methods that deliver authentication results through strongly-typed parameters. Understanding these structures is essential for parsing responses correctly.
Template Status Check Callback Parameters
When the SDK calls your onIDVCheckUserBiometricTemplateStatus callback, you receive:
func onIDVCheckUserBiometricTemplateStatus(
    _ userID: String,              // Current user identifier
    idvResponse: String,           // JSON string with detailed info
    status: RDNARequestStatus,     // Backend status (statusCode, statusMessage)
    error: RDNAError              // SDK error (longErrorCode, errorString)
)
Status Codes (in status.statusCode):
100= Template present on server (user can authenticate)600= Template does not exist (user must complete biometric opt-in first)400/500= Error codes
Validation Pattern:
- Check
error.longErrorCodefirst (0 = OK) - Then check
status.statusCode(100 = exists, 600 = no template) - Parse
idvResponseJSON for detailed information
Parsing Template Status Response
The idvResponse string contains JSON with this structure:
// Example idvResponse JSON structure
{
  "status_code": 100,              // Same as status.statusCode
  "status_message": "Success",
  "orchestration_use_case": "RDNA_IDV_CHECK_TEMPLATE",
  "result": true,                  // true if template exists
  "attempts_left": 5,
  "user_id": "user123"
}
Parsing Example:
guard let data = idvResponse.data(using: .utf8),
      let json = try? JSONSerialization.jsonObject(with: data) as? [String: Any] else {
    return
}

let statusCode = json["status_code"] as? Int ?? 0
let result = json["result"] as? Bool ?? false
let attemptsLeft = json["attempts_left"] as? Int ?? 0
Server Biometric Authentication Callback Parameters
When the SDK calls your onIDVServerBiometricAuthenticationResult callback, you receive:
func onIDVServerBiometricAuthenticationResult(
    _ userID: String,              // Current user identifier
    idvResponse: String,           // JSON with video data + audit info
    status: RDNARequestStatus,     // Backend status
    error: RDNAError              // SDK error
)
Challenge Mode: Always 25 for server biometric authentication
Validation Pattern:
- Check
error.longErrorCodefirst (0 = OK, 240 = user cancelled) - Then check
status.statusCode(100 or 0 = success) - Parse
idvResponseto checkidv_audit_info.status(SUCCESS/FAILURE)
Parsing Authentication Response
The idvResponse contains complex JSON with video data and audit information:
// Example idvResponse JSON structure (partial)
{
  "video": {
    "workflow_data": { /* frames, rotation, workflow */ },
    "meta_data": { /* device info */ },
    "client_version": "1.0"
  },
  "idv_audit_info": {
    "reason": "Server Biometric Authentication",
    "audit_metrics": {
      "start_timestamp": 1234567890,
      "end_timestamp": 1234567900
    },
    "status": "SUCCESS",                    // ← CRITICAL: SUCCESS or FAILURE
    "idv_audit_transaction_id": "txn_123",  // ← Unique transaction ID
    "orchestration_use_case": "RDNA_IDV_POSTLOGIN_IDV_SELFIE_BIOMETRIC"
  },
  "purpose": "Server Biometric Authentication",
  "attempts": 1,
  "user_id": "user123",
  "attempts_left": 4
}
Parsing Example for Audit Info:
guard let data = idvResponse.data(using: .utf8),
      let json = try? JSONSerialization.jsonObject(with: data) as? [String: Any] else {
    return
}

// Parse biometric result
let biometricResult = json["biometric_result"] as? [String: Any]
let displayText = biometricResult?["display_text"] as? String ?? "Unknown"

// Parse audit info
let auditInfo = json["idv_audit_info"] as? [String: Any]
let auditStatus = auditInfo?["status"] as? String ?? "UNKNOWN"
let transactionId = auditInfo?["idv_audit_transaction_id"] as? String ?? "N/A"
let useCase = auditInfo?["orchestration_use_case"] as? String ?? "N/A"
let attemptsLeft = json["attempts_left"] as? Int ?? 0

// Determine success
let isSuccess = displayText == "MATCHED"
Key Response Fields
Template Status Check:
status.statusCode: 100 (exists) or 600 (no template)idvResponse.result: Boolean indicating template existence
Authentication Result:
error.longErrorCode: 0 (success), 240 (user cancelled), other (errors)status.statusCode: 100 or 0 (success)idvResponse.biometric_result.display_text: "MATCHED", "NOT_MATCHED", "LIVENESS_FAILED"idvResponse.idv_audit_info.status: "SUCCESS" or "FAILURE"idvResponse.idv_audit_info.idv_audit_transaction_id: Unique transaction identifier
Three-Tier Validation Pattern
Always validate in this order:
// Tier 1: Check SDK error
if error.longErrorCode != 0 {
    // SDK error - handle immediately
    print("SDK error: \(error.errorString)")
    return
}

// Tier 2: Check backend status
if status.statusCode != 100 && status.statusCode != 0 {
    // Backend error
    print("Status error: \(status.statusMessage)")
    return
}

// Tier 3: Parse idvResponse for detailed audit data
guard let json = parseJSON(idvResponse),
      let auditStatus = getAuditStatus(json) else {
    return
}

if auditStatus == "SUCCESS" {
    // Handle success
} else {
    // Handle failure with audit details
}
Key Points
- Status Code 100: Template exists - enable authentication
- Status Code 600: No template - disable authentication, show message
- Challenge Mode 25: Authentication result callback identifier
- Audit Status: SUCCESS/FAILURE in
idv_audit_info.statusfield - Error 240: User cancelled (close button on selfie confirmation)
- Three-Tier Validation: error → status → idvResponse (in that order)
- JSON Parsing: Use JSONSerialization for
idvResponsestrings - Biometric Result: Check
display_textfor MATCHED/NOT_MATCHED
Overview
Implement the main screen that handles template status check, authentication initiation, and result display. This screen uses the view lifecycle pattern for robust callback handling.
Screen Setup and State Management
Create ServerBiometricAuthenticationViewController.swift:
// Sources/Tutorial/Screens/IDV/ServerBiometricAuthenticationViewController.swift

import UIKit
import RELID

class ServerBiometricAuthenticationViewController: UIViewController {

    // MARK: - IBOutlets

    @IBOutlet weak var menuButton: UIButton!
    @IBOutlet weak var scrollView: UIScrollView!
    @IBOutlet weak var subtitleLabel: UILabel!
    @IBOutlet weak var templateStatusCard: UIView!
    @IBOutlet weak var templateStatusTitleLabel: UILabel!
    @IBOutlet weak var templateStatusTextLabel: UILabel!
    @IBOutlet weak var templateStatusCodeLabel: UILabel!
    @IBOutlet weak var statusBannerView: UIView!
    @IBOutlet weak var statusBannerLabel: UILabel!
    @IBOutlet weak var startButton: UIButton!
    @IBOutlet weak var disabledNoteLabel: UILabel!

    // MARK: - Properties

    private var isCheckingStatus = false
    private var isAuthenticating = false

    private struct TemplateStatus {
        var checked: Bool
        var exists: Bool
        var statusCode: Int
        var statusMessage: String
    }

    private var templateStatus = TemplateStatus(
        checked: false,
        exists: false,
        statusCode: 0,
        statusMessage: ""
    )

    // ... continue with lifecycle
}
Implement View Lifecycle
    // MARK: - Lifecycle

    override func viewDidLoad() {
        super.viewDidLoad()

        setupUI()
        setupEventHandlers()
        checkTemplateStatus()
    }

    override func viewWillAppear(_ animated: Bool) {
        super.viewWillAppear(animated)

        // Re-register event handlers when screen appears
        setupEventHandlers()

        // Reset button states
        isAuthenticating = false
        isCheckingStatus = false
        updateButtonState()
    }

    override func viewWillDisappear(_ animated: Bool) {
        super.viewWillDisappear(animated)

        // Don't clear handlers here - they need to stay active during native UI
    }
Implement Event Handler Registration
    private func setupEventHandlers() {
        print("ServerBiometricAuthenticationViewController - Setting up event handlers")

        // Register closures with RDNAIDVDelegateManager
        RDNAIDVDelegateManager.shared.onIDVCheckUserBiometricTemplateStatus = { [weak self] userID, idvResponse, status, error in
            self?.handleCheckUserBiometricTemplateStatus(userID: userID, idvResponse: idvResponse, status: status, error: error)
        }

        RDNAIDVDelegateManager.shared.onIDVServerBiometricAuthenticationResult = { [weak self] userID, idvResponse, status, error in
            self?.handleServerBiometricAuthenticationResult(userID: userID, idvResponse: idvResponse, status: status, error: error)
        }
    }
Implement Template Status Check Flow
    // MARK: - Template Status Check

    private func checkTemplateStatus() {
        print("ServerBiometricAuthenticationViewController - Checking template status")

        isCheckingStatus = true
        updateButtonState()

        let error = RDNAIDVService.shared.checkIDVUserBiometricTemplateStatus()

        if error.longErrorCode != 0 {
            print("ServerBiometricAuthenticationViewController - CheckIDVUserBiometricTemplateStatus sync error:")
            print("  Error: \(error.errorString)")
            print("  Code: \(error.longErrorCode)")

            isCheckingStatus = false
            updateTemplateStatus(checked: true, exists: false, statusCode: 0, statusMessage: "Error: \(error.errorString)")
            updateButtonState()

            showAlert(title: "Template Status Check Error", message: "Failed to check template status: \(error.errorString)")
        } else {
            print("ServerBiometricAuthenticationViewController - CheckIDVUserBiometricTemplateStatus sync success")
            print("  Awaiting onIDVCheckUserBiometricTemplateStatus callback")
            // The callback will update UI
        }
    }

    private func handleCheckUserBiometricTemplateStatus(userID: String, idvResponse: String, status: RDNARequestStatus, error: RDNAError) {
        print("ServerBiometricAuthenticationViewController - Check user biometric template status callback received")
        print("  User ID: \(userID)")
        print("  Status Code: \(status.statusCode)")
        print("  Status Message: \(status.statusMessage ?? "nil")")
        print("  Error Code: \(error.longErrorCode)")

        isCheckingStatus = false

        // First check: error code
        if error.longErrorCode != 0 {
            print("  Error checking template status: \(error.errorString)")
            updateTemplateStatus(checked: true, exists: false, statusCode: Int(status.statusCode), statusMessage: "Error: \(error.errorString)")
            updateButtonState()
            return
        }

        // Second check: status code
        if status.statusCode == 100 {
            // Template present
            print("  Template exists")
            updateTemplateStatus(checked: true, exists: true, statusCode: Int(status.statusCode), statusMessage: status.statusMessage)
        } else if status.statusCode == 600 {
            // Template does not exist
            print("  Template does not exist")
            updateTemplateStatus(checked: true, exists: false, statusCode: Int(status.statusCode), statusMessage: status.statusMessage)
        } else {
            // Other status codes (error)
            print("  Status error: \(status.statusCode)")
            updateTemplateStatus(checked: true, exists: false, statusCode: Int(status.statusCode), statusMessage: status.statusMessage)
        }

        updateButtonState()
    }

    private func updateTemplateStatus(checked: Bool, exists: Bool, statusCode: Int, statusMessage: String) {
        templateStatus.checked = checked
        templateStatus.exists = exists
        templateStatus.statusCode = statusCode
        templateStatus.statusMessage = statusMessage

        // Update UI
        templateStatusCard.isHidden = false

        if exists {
            templateStatusTitleLabel.text = "✅ Biometric Template Status"
            templateStatusTextLabel.text = "Your biometric template is stored on the server. You can proceed with authentication."
            styleCard(templateStatusCard, borderColor: UIColor(hex: "#27ae60"))
        } else {
            templateStatusTitleLabel.text = "⚠️ Biometric Template Status"
            templateStatusTextLabel.text = "No biometric template found on the server. Please complete biometric opt-in first."
            styleCard(templateStatusCard, borderColor: UIColor(hex: "#e74c3c"))
        }

        templateStatusCodeLabel.text = "Status: \(statusMessage) (Code: \(statusCode))"
    }
Implement Authentication Flow
    // MARK: - Authentication

    @IBAction func startButtonTapped(_ sender: UIButton) {
        print("ServerBiometricAuthenticationViewController - Start button tapped")

        isAuthenticating = true
        updateButtonState()

        let reason = "Server Biometric Authentication"
        let error = RDNAIDVService.shared.initiateIDVServerBiometricAuthentication(reason: reason)

        if error.longErrorCode != 0 {
            print("ServerBiometricAuthenticationViewController - InitiateIDVServerBiometricAuthentication sync error:")
            print("  Error: \(error.errorString)")
            print("  Code: \(error.longErrorCode)")

            isAuthenticating = false
            updateButtonState()

            showAlert(title: "Authentication Error", message: "Failed to initiate authentication: \(error.errorString)")
        } else {
            print("ServerBiometricAuthenticationViewController - InitiateIDVServerBiometricAuthentication sync success")
            print("  Awaiting onIDVServerBiometricAuthenticationResult callback")
            // The callback will update UI
        }
    }

    private func handleServerBiometricAuthenticationResult(userID: String, idvResponse: String, status: RDNARequestStatus, error: RDNAError) {
        print("ServerBiometricAuthenticationViewController - Server biometric authentication result callback received")
        print("  User ID: \(userID)")
        print("  Status Code: \(status.statusCode)")
        print("  Status Message: \(status.statusMessage)")
        print("  Error Code: \(error.longErrorCode)")

        // Reset button state
        isAuthenticating = false
        updateButtonState()

        // Dismiss SDK selfie screen first, then show alert
        print("ServerBiometricAuthenticationViewController - Dismissing selfie screen")
        dismissSelfieScreenAndShowResult(idvResponse: idvResponse, status: status, error: error)
    }
Implement Result Parsing and Display
    private func dismissSelfieScreenAndShowResult(idvResponse: String, status: RDNARequestStatus, error: RDNAError) {
        // Check if there are other view controllers on the navigation stack above us
        if let navController = navigationController,
           let selfIndex = navController.viewControllers.firstIndex(of: self),
           selfIndex < navController.viewControllers.count - 1 {
            // Pop back to this view controller
            print("ServerBiometricAuthenticationViewController - Popping back to self")
            navController.popToViewController(self, animated: true)

            // Wait for pop animation to complete
            DispatchQueue.main.asyncAfter(deadline: .now() + 0.5) { [weak self] in
                print("ServerBiometricAuthenticationViewController - Pop completed, showing result")
                self?.processAuthenticationResult(idvResponse: idvResponse, status: status, error: error)
            }
        } else {
            print("ServerBiometricAuthenticationViewController - Already on top, showing result directly")
            processAuthenticationResult(idvResponse: idvResponse, status: status, error: error)
        }
    }

    private func processAuthenticationResult(idvResponse: String, status: RDNARequestStatus, error: RDNAError) {
        print("ServerBiometricAuthenticationViewController - Processing authentication result")

        // First check: error code
        if error.longErrorCode != 0 {
            print("  Error in authentication: \(error.errorString)")
            showAlert(
                title: "Authentication Error",
                message: "\(error.errorString)\n\nError Code: \(error.longErrorCode)"
            )
            return
        }

        // Second check: status code (100 or 0 = success for IDV server biometric auth)
        if status.statusCode != 100 && status.statusCode != 0 {
            print("  Status error: \(status.statusCode)")
            showAlert(
                title: "Authentication Failed",
                message: "Status: \(status.statusMessage)\nStatus Code: \(status.statusCode)"
            )
            return
        }

        // Success - parse idvResponse to check audit status
        print("  ✅ Authentication completed successfully, parsing result")
        parseAndShowAuthenticationResult(idvResponse: idvResponse)
    }

    private func parseAndShowAuthenticationResult(idvResponse: String) {
        print("ServerBiometricAuthenticationViewController - Parsing authentication result")
        print("  IDV Response: \(idvResponse)")

        guard let data = idvResponse.data(using: .utf8),
              let json = try? JSONSerialization.jsonObject(with: data) as? [String: Any] else {
            print("  ⚠️ Failed to parse JSON")
            showAlert(
                title: "Authentication Complete",
                message: "Authentication completed successfully"
            )
            return
        }

        // Parse biometric result
        let biometricResult = json["biometric_result"] as? [String: Any]
        let displayText = biometricResult?["display_text"] as? String ?? "Unknown"

        // Parse audit info
        let auditInfo = json["idv_audit_info"] as? [String: Any]
        let orchestrationUseCase = auditInfo?["orchestration_use_case"] as? String ?? "N/A"
        let transactionId = auditInfo?["idv_audit_transaction_id"] as? String ?? "N/A"
        let attemptsLeft = json["attempts_left"] as? Int ?? 0

        // Determine success based on biometric result display text
        let isSuccess = displayText == "MATCHED"

        if isSuccess {
            showAlert(
                title: "✅ Authentication Success",
                message: """
                Biometric Result: \(displayText)

                Use Case: \(orchestrationUseCase)
                Transaction ID: \(transactionId)
                Attempts Left: \(attemptsLeft)
                """,
                actions: [
                    UIAlertAction(title: "Back to Dashboard", style: .default) { [weak self] _ in
                        self?.navigateToDashboard()
                    }
                ]
            )
        } else {
            showAlert(
                title: "❌ Authentication Failed",
                message: """
                Biometric Result: \(displayText)

                Use Case: \(orchestrationUseCase)
                Transaction ID: \(transactionId)
                Attempts Left: \(attemptsLeft)
                """
            )
        }
    }
Implement Button State Updates
    // MARK: - Button State

    private func updateButtonState() {
        if isCheckingStatus {
            startButton.setTitle("Checking Template Status...", for: .normal)
            startButton.isEnabled = false
            startButton.backgroundColor = UIColor(hex: "#95a5a6") ?? .gray
            disabledNoteLabel.isHidden = true
        } else if isAuthenticating {
            startButton.setTitle("Authenticating...", for: .normal)
            startButton.isEnabled = false
            startButton.backgroundColor = UIColor(hex: "#95a5a6") ?? .gray
            disabledNoteLabel.isHidden = true
        } else if !templateStatus.exists && templateStatus.checked {
            startButton.setTitle("Start Authentication", for: .normal)
            startButton.isEnabled = false
            startButton.backgroundColor = UIColor(hex: "#95a5a6") ?? .gray
            disabledNoteLabel.isHidden = false
        } else {
            startButton.setTitle("Start Authentication", for: .normal)
            startButton.isEnabled = templateStatus.exists
            startButton.backgroundColor = templateStatus.exists ? (UIColor(hex: "#3498db") ?? .blue) : (UIColor(hex: "#95a5a6") ?? .gray)
            disabledNoteLabel.isHidden = !templateStatus.checked || templateStatus.exists
        }
    }
UI Preview: Server Biometric Authentication Screen
State 1: Template Exists (Status Code 100) - Button Enabled
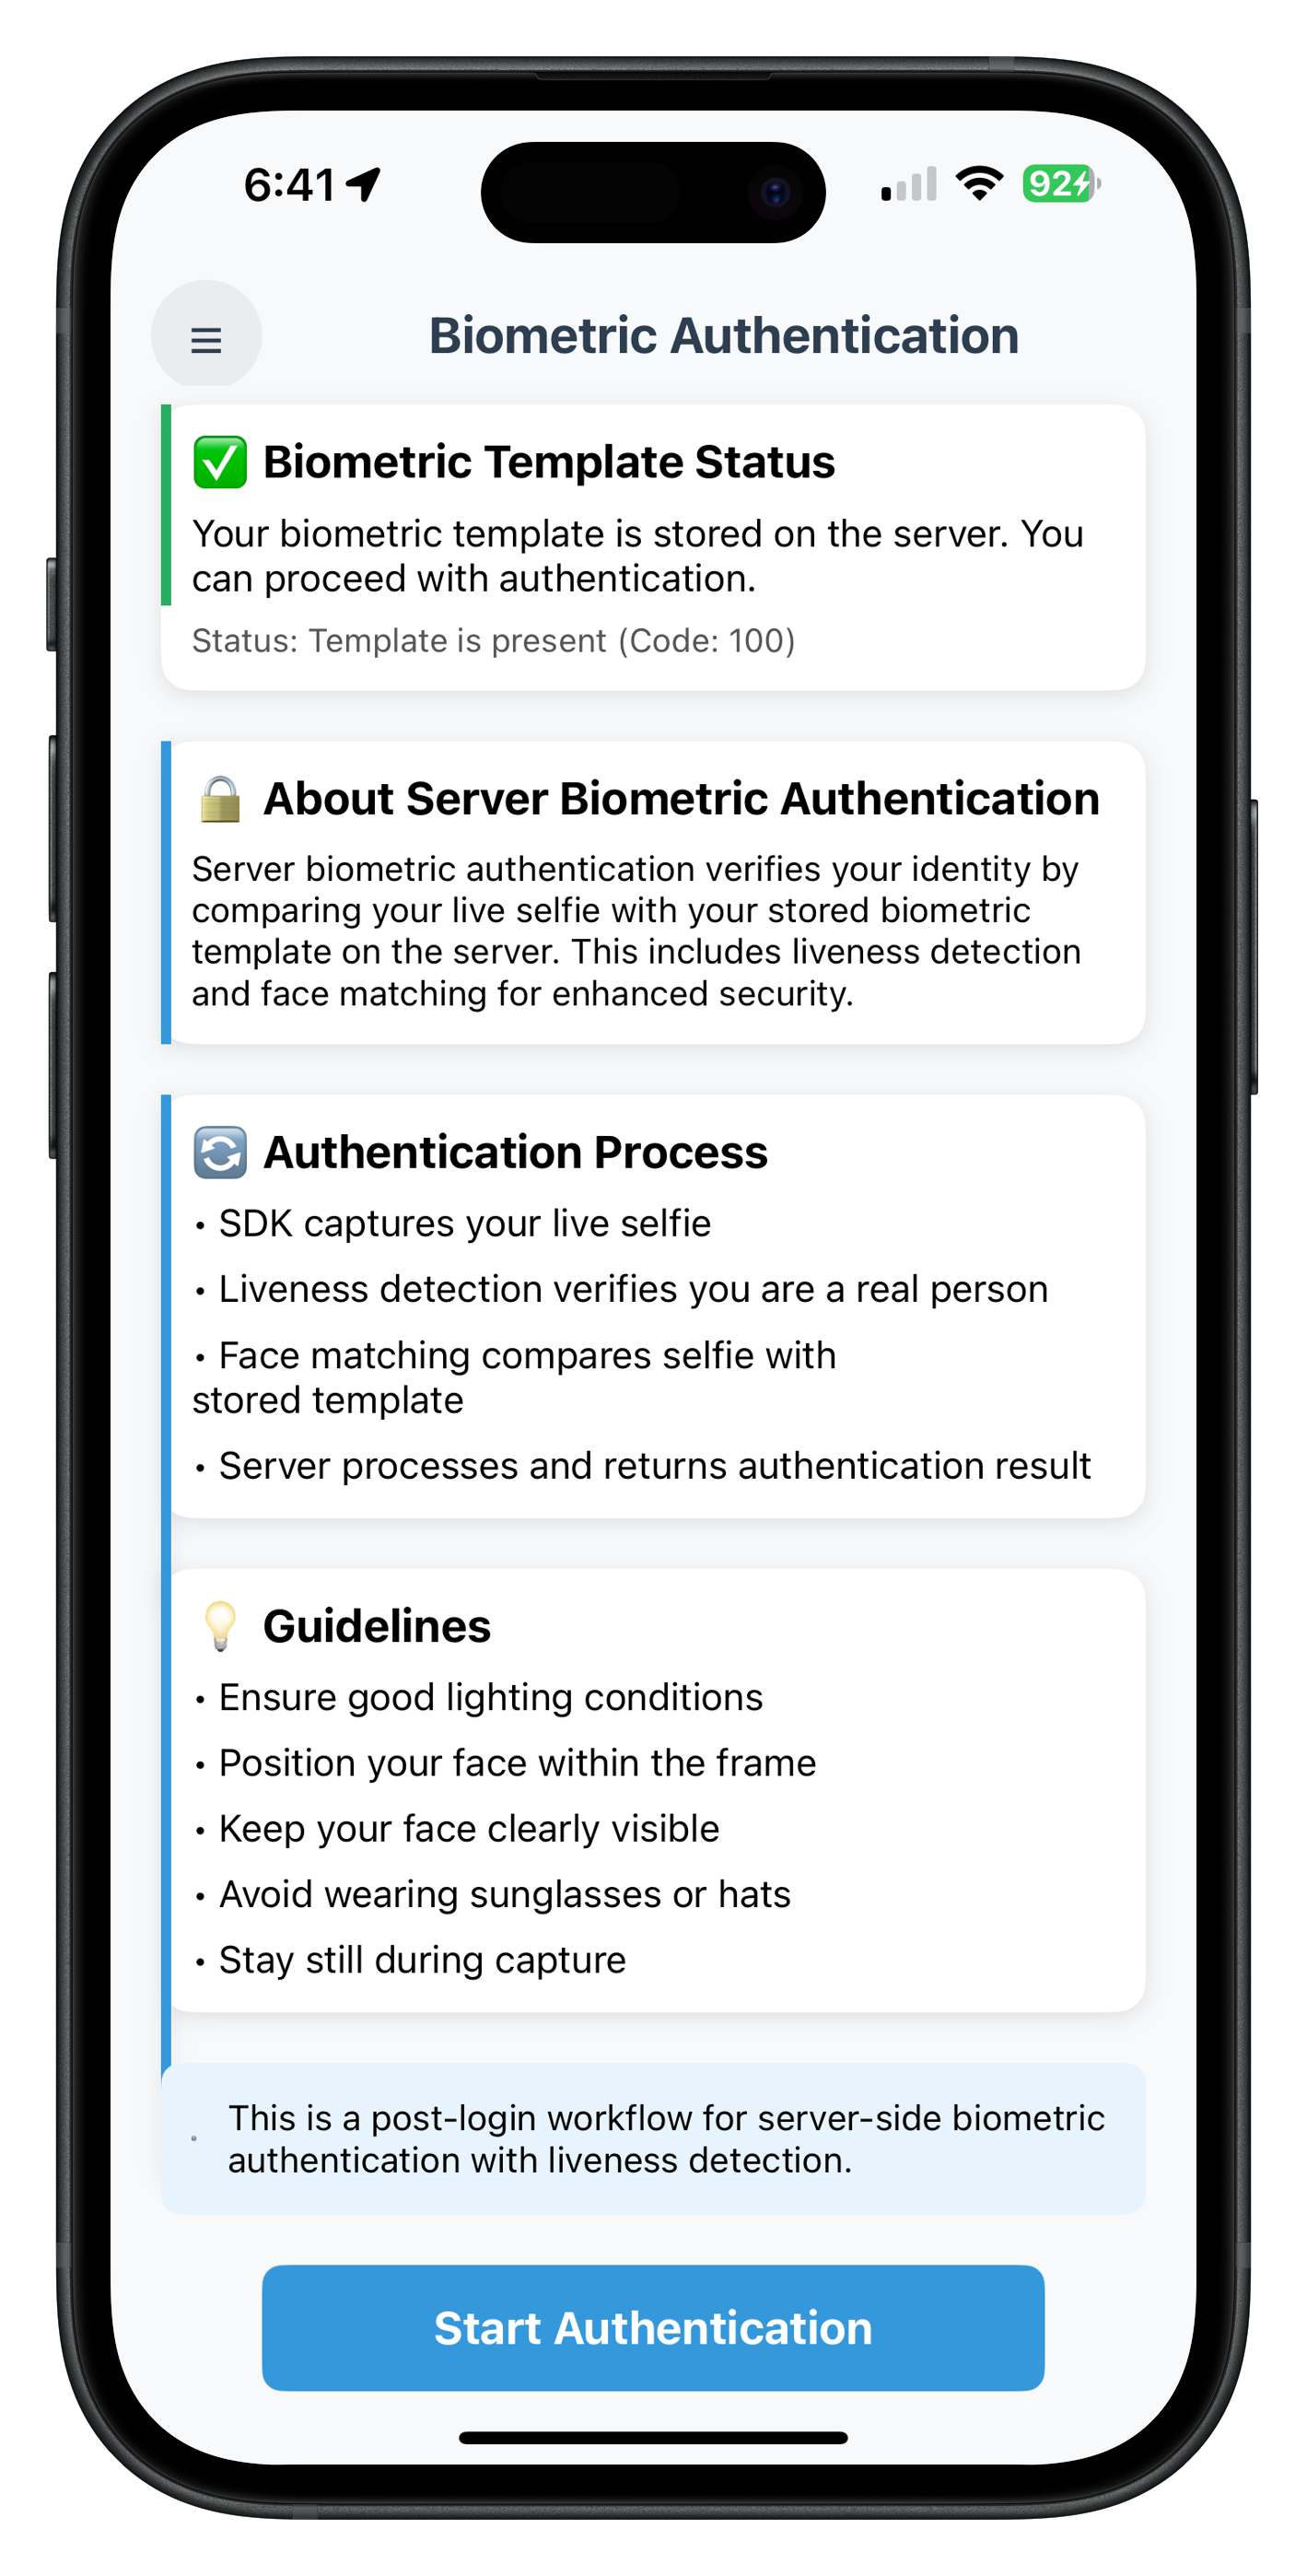
When the template exists (status code 100), a green banner displays "✅ Your biometric template is stored on the server" and the "Start Authentication" button is enabled (blue).
State 2: No Template (Status Code 600) - Button Disabled
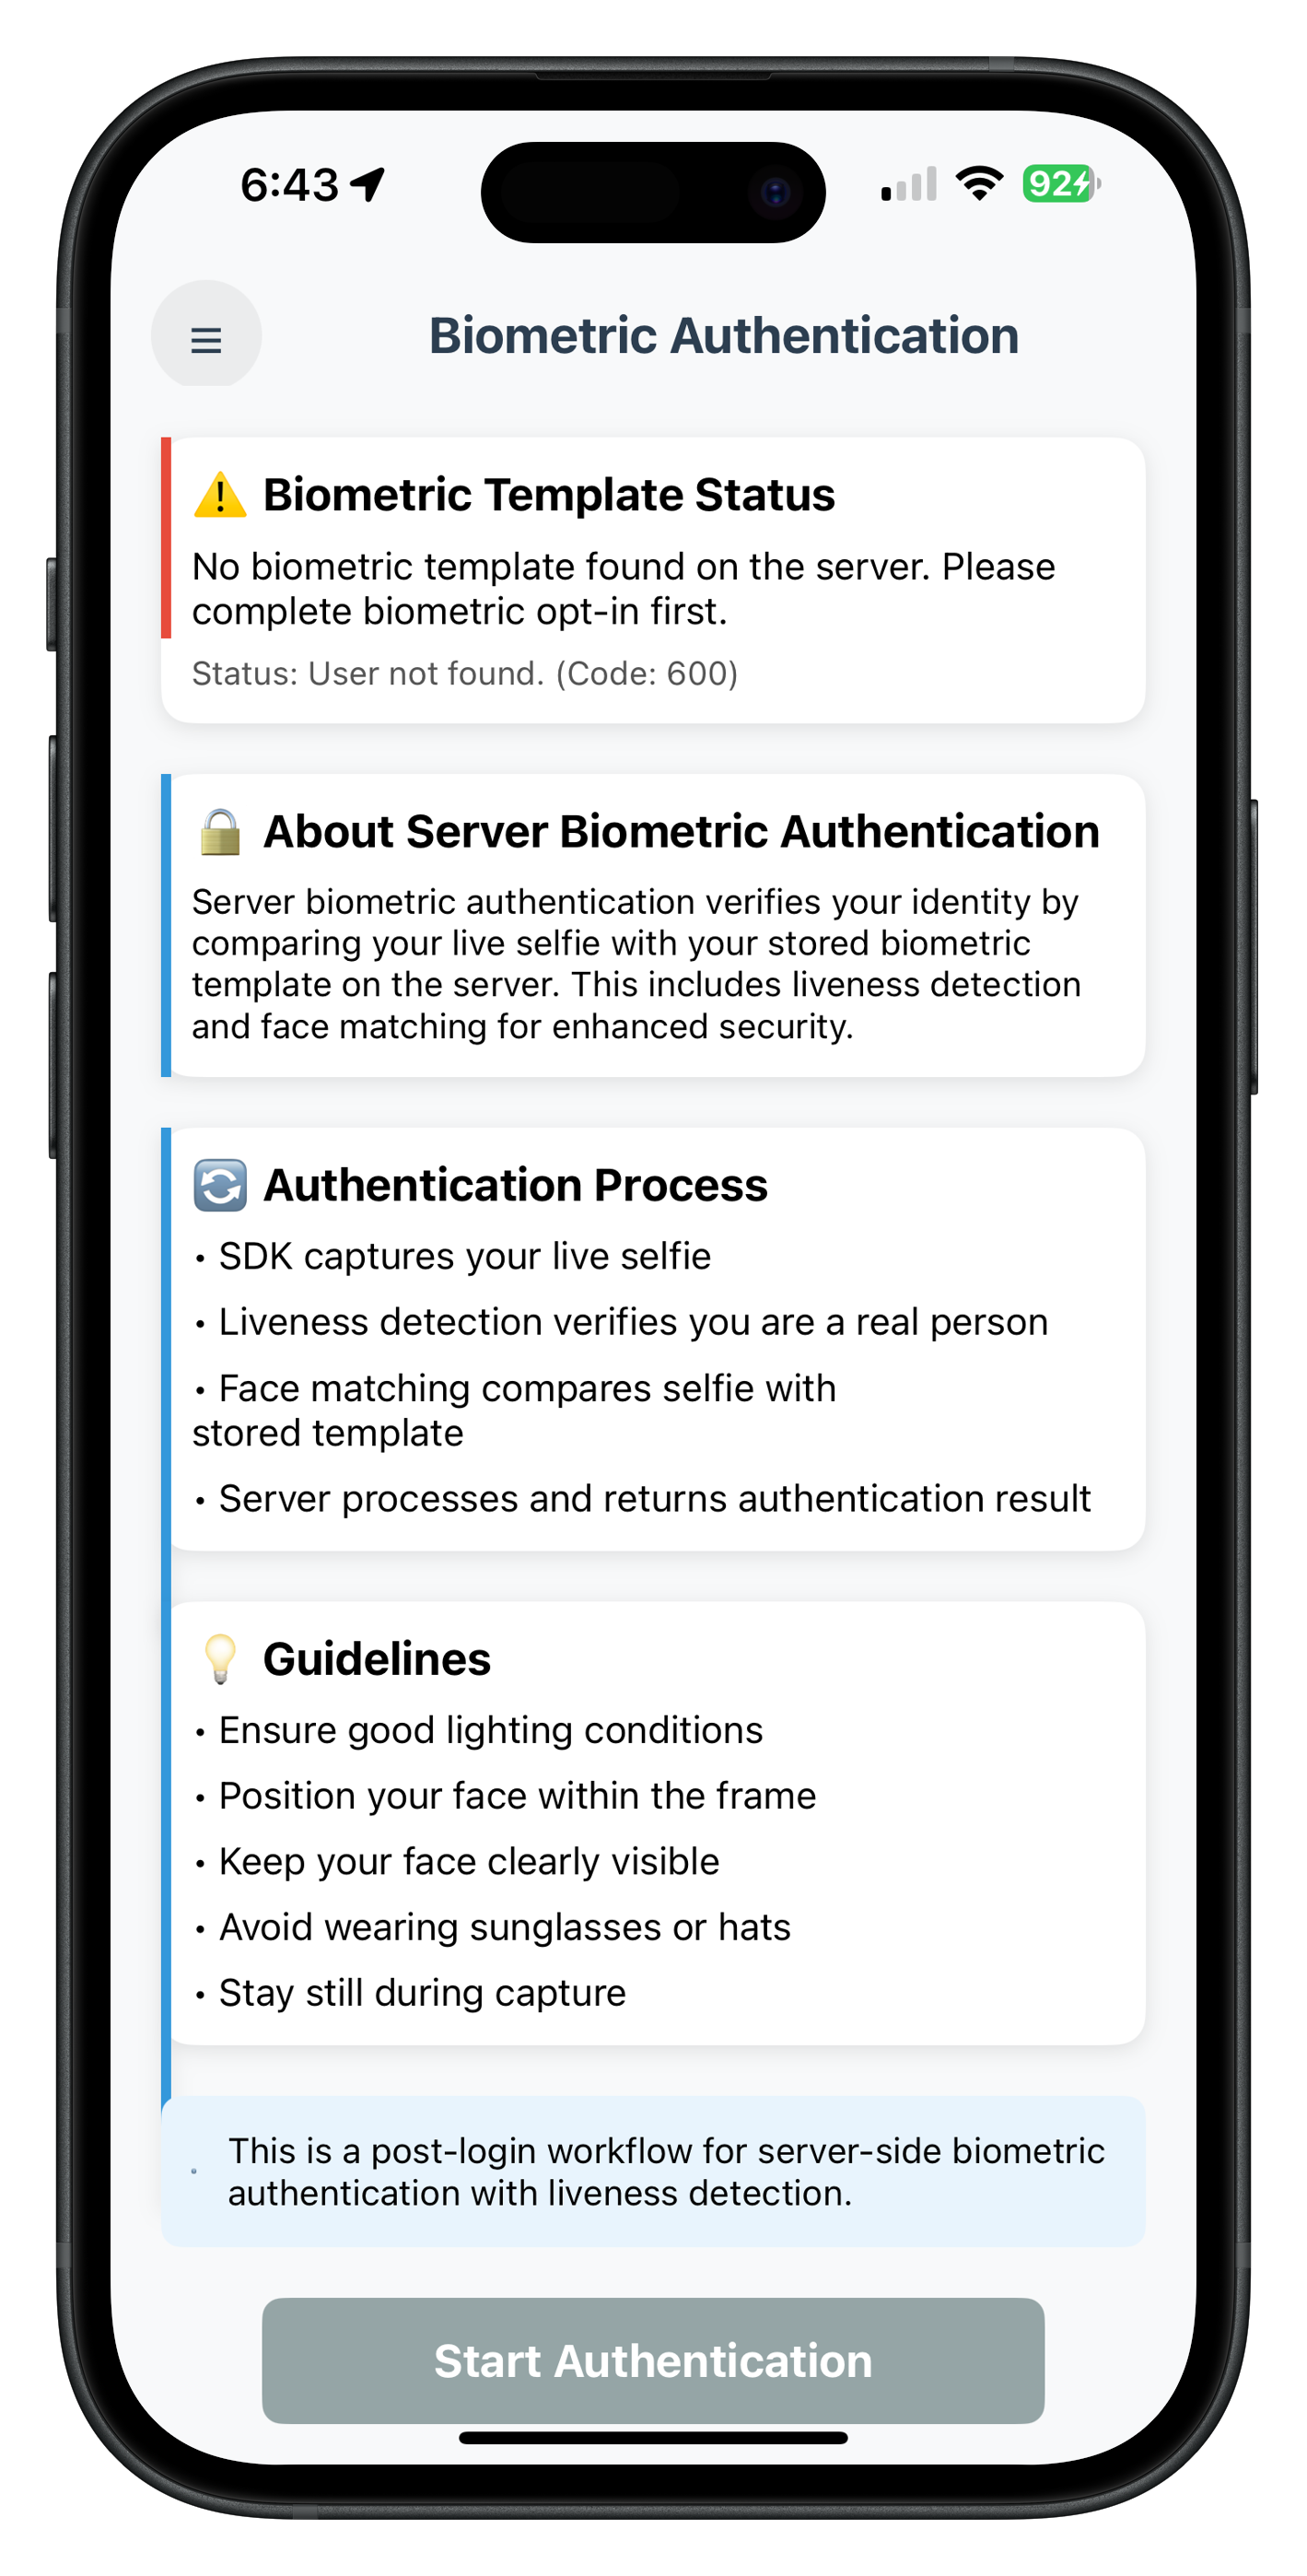
When no template is found (status code 600), a red banner displays "⚠️ No biometric template found on the server" with help text, and the "Start Authentication" button is disabled (grey).
Key Points
- View Lifecycle Pattern: Handlers registered in viewDidLoad and viewWillAppear
- Template Check on Load: Automatic check ensures button state is always correct
- Navigate-Back-Before-Alert: 500ms delay for smooth alert display
- Status Code Validation: 100=enable button, 600=disable with message
- Audit Data Display: Shows status, use case, transaction ID, attempts left
Add Route to Navigation Coordinator
Update AppIDVCoordinator.swift:
// Sources/Tutorial/Navigation/AppIDVCoordinator.swift

class AppIDVCoordinator {
    static let shared = AppIDVCoordinator()
    private weak var navigationController: UINavigationController?
    private let storyboard = UIStoryboard(name: "Main", bundle: nil)

    private init() {}

    func configure(with navigationController: UINavigationController) {
        self.navigationController = navigationController
    }

    func showServerBiometricAuthentication(animated: Bool = true) {
        guard let vc = storyboard.instantiateViewController(
            withIdentifier: "ServerBiometricAuthenticationViewController"
        ) as? ServerBiometricAuthenticationViewController else {
            print("IDVCoordinator - Failed to instantiate ServerBiometricAuthenticationViewController")
            return
        }

        DispatchQueue.main.async { [weak self] in
            self?.navigationController?.pushViewController(vc, animated: animated)
            print("IDVCoordinator - Navigated to ServerBiometricAuthentication")
        }
    }
}
Add Menu Item
Update MenuViewController.swift:
// Sources/Tutorial/Screens/MenuViewController.swift

enum MenuOption: CaseIterable {
    case dashboard
    case serverBiometricAuthentication
    case deviceManagement
    // ... other options

    var title: String {
        switch self {
        case .serverBiometricAuthentication:
            return "🔐 Biometric Authentication"
        // ... other cases
        }
    }
}

// In menu button handler:
case .serverBiometricAuthentication:
    print("MenuViewController - Navigating to server biometric authentication")
    AppIDVCoordinator.shared.showServerBiometricAuthentication()
    dismiss(animated: true)
Update Storyboard
Add the view controller to Main.storyboard:
<!-- Storyboard ID: ServerBiometricAuthenticationViewController -->
<!-- Class: ServerBiometricAuthenticationViewController -->
<!-- Module: relidcodelab -->
Complete Flow Walkthrough
Test the complete server biometric authentication flow:
Step 1: Login and Navigate
1. Launch the app
2. Complete user login (activated customer)
3. Navigate to Dashboard
4. Tap menu button (hamburger icon)
5. Select "🔐 Biometric Authentication"
Step 2: Template Status Check
1. Screen loads and automatically checks template status
2. Observe loading state: "Checking template status..."
3. Template status displayed:
   - ✅ If template exists (status code 100):
     - Green banner with "Your biometric template is stored on the server"
     - "Start Authentication" button enabled (blue)
   - ⚠️ If no template (status code 600):
     - Red banner with "No biometric template found on the server"
     - "Start Authentication" button disabled (grey)
     - Help text: "Please complete biometric opt-in first"
Step 3: Start Authentication (if template exists)
1. Tap "Start Authentication" button
2. Button shows loading: "Authenticating..."
3. SDK initiates workflow 8 (selfie capture)
4. Selfie confirmation screen appears (reused from IDV MFA flow)
Step 4: Selfie Capture
1. Tap "Start Selfie Capture" button
   → Native camera opens with Aware FaceCapture
   → Liveness detection guides user
   → User captures selfie
   → Camera closes

2. OR Tap Close button (X)
   → Error 240 triggered (user cancelled)
   → Result callback fires immediately
Step 5: View Authentication Result
1. Navigation back to ServerBiometricAuthentication screen
2. 500ms delay
3. Result alert appears:

   Success Alert (biometric result = MATCHED):
   ✅ Authentication Success
   - Biometric Result: MATCHED
   - Use Case: RDNA_IDV_POSTLOGIN_IDV_SELFIE_BIOMETRIC
   - Transaction ID: [unique ID]
   - Attempts Left: [number]
   - Button: "Back to Dashboard"

   Failure Alert (biometric result != MATCHED):
   ❌ Authentication Failed
   - Biometric Result: NOT_MATCHED
   - Use Case: RDNA_IDV_POSTLOGIN_IDV_SELFIE_BIOMETRIC
   - Transaction ID: [unique ID]
   - Attempts Left: [number]
   - Button: "OK"

   Cancellation (error 240):
   Authentication Error
   - User Cancelled
   - Error Code: 240
   - Button: "OK"
Testing Scenarios
Scenario 1: User with Template (Happy Path)
✅ Template check returns status code 100
✅ Button enabled
✅ User taps "Start Authentication"
✅ Selfie capture completes
✅ Authentication succeeds (biometric result = MATCHED)
✅ Success alert shown
✅ User taps "Back to Dashboard"
✅ Navigates to Dashboard
Scenario 2: User Without Template
⚠️ Template check returns status code 600
⚠️ Button disabled (grey color)
⚠️ Red banner: "No biometric template found"
⚠️ Help text: "Please complete biometric opt-in first"
⚠️ User cannot proceed with authentication
Scenario 3: User Cancels Selfie Capture
✅ Template check succeeds (status code 100)
✅ User taps "Start Authentication"
✅ Selfie confirmation screen appears
❌ User taps Close button (X)
❌ Error 240 triggered
❌ Navigate back to authentication screen
❌ Error alert: "User Cancelled (Error Code: 240)"
✅ User taps "OK"
✅ Button re-enabled, can retry
Scenario 4: Authentication Failure (Server Rejection)
✅ Template check succeeds
✅ User completes selfie capture
❌ Server determines face doesn't match
❌ Biometric result = NOT_MATCHED
❌ Navigate back to authentication screen
❌ Failure alert with audit data
✅ User can retry authentication
Scenario 5: Return to Screen After Authentication
✅ User completes authentication (success or failure)
✅ User navigates to Dashboard
✅ User returns to Biometric Authentication from menu
✅ viewWillAppear() triggers → Re-registers handlers
✅ Template status check runs automatically
✅ UI state reset (isAuthenticating = false)
✅ Template status displayed
✅ User can perform another authentication
Verification Checklist
Use this checklist to verify your implementation:
- [ ] Template status check runs automatically on viewDidLoad
- [ ] Status code 100 enables button with green banner
- [ ] Status code 600 disables button with red banner
- [ ] "Start Authentication" button shows loading state
- [ ] Selfie confirmation screen appears (workflow 8)
- [ ] Native camera opens for selfie capture
- [ ] Close button (X) triggers error 240 gracefully
- [ ] Authentication result navigates back to screen
- [ ] 500ms delay before alert appears
- [ ] Success alert shows all audit data correctly
- [ ] Failure alert shows all audit data correctly
- [ ] "Back to Dashboard" button works from success alert
- [ ] Returning to screen re-checks template status
- [ ] Menu button works throughout flow
- [ ] Callback handlers persist during native UI (selfie capture)
- [ ] Multiple authentications work correctly
🎉 Congratulations!
You've successfully implemented the REL-ID IDV Post-Login Server Biometric Authentication Flow in your iOS application!
What You've Accomplished
✅ Template Status Validation: Implemented automatic biometric template checking with status codes 100/600
✅ Server Biometric Authentication: Built complete authentication workflow with workflow 8 and challenge mode 25
✅ View Lifecycle Pattern: Mastered persistent callback handlers during native UI workflows
✅ Navigate-Back-Before-Alert Pattern: Implemented proper navigation for result display
✅ Audit Data Display: Parsed and displayed comprehensive authentication audit information
✅ Error Handling: Gracefully handled error 240 (user cancellation) and authentication failures
✅ Production-Ready Implementation: Built robust, user-friendly biometric verification experience
Key Takeaways
- Template Check First: Always verify template existence before allowing authentication
- Workflow 8: Server biometric authentication uses selfie capture only
- Challenge Mode 25: Authentication result callback identifier
- View Lifecycle Pattern: Critical for persistent handlers during native UI
- Status Codes Matter: 100=enable, 600=disable with clear messaging
- Audit Data: Parse
biometric_result.display_textfor MATCHED/NOT_MATCHED validation
Next Steps
Now that you've mastered server biometric authentication, consider:
- Explore Other IDV Flows: KYC flow, Additional Document Scan flow
- Add Biometric Settings: Allow users to manage their biometric templates
- Optimize UX: Add animations, better messaging, retry logic
- Security Enhancements: Implement attempt limits, lockout policies
Resources
🔐 Thank you for completing the REL-ID IDV Post-Login Server Biometric Authentication Flow codelab!
You're now equipped to implement production-ready server-side biometric verification for activated customers with stored templates, providing secure and convenient identity verification with liveness detection and comprehensive audit trails.